

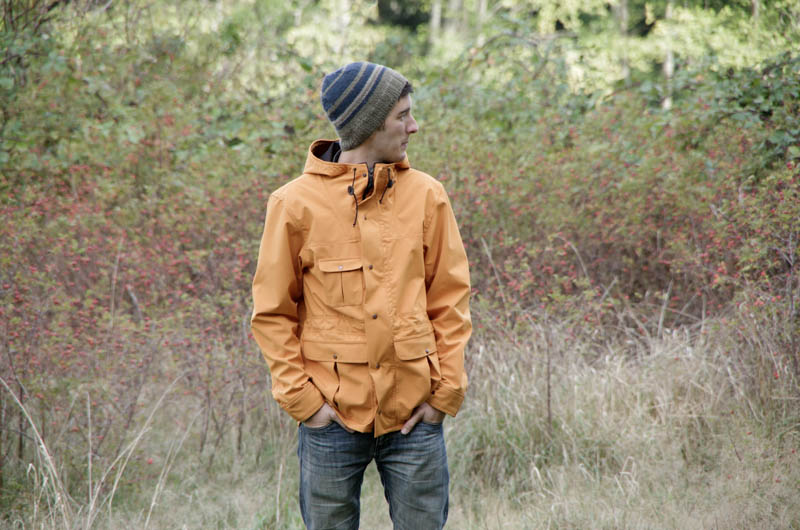
I have a whopper of a sewing project to show you today! I sewed Matt a waterproof, windproof and breathable anorak jacket and I couldn’t be happier with how it turned out!

I used the Hot Patterns Hemmingway Windcheater pattern that we stock in our shop and modified it to be unlined as per Matt’s request. He really wanted a light shell with lots of room for bulky sweaters underneath. He chose the Pumpkin Dintex waterproof/windproof/breathable fabric from our shop because he wanted a jacket that would be very visible while hiking and hunting in the forest (safety first!). Plus…he looks awesome in orange :D. This fabric is comprised of three layers – a soft shell exterior, a waterproof film, and a mesh interior.
I was so thrilled with how easy the Dintex material was to work with. I just used a regular old needle (probably quite dull) and I even did a bunch of stitch ripping with no bad results. I just rubbed my finger over the needle holes and they disappeared completely. The fabric is quite thin and very stable so it was basically like sewing quilting cotton…no stretching or slipping while I sewed. It doesn’t fray at all so I could have left all of the seams unfinished if I had wanted to without the need for a serger or even pinking shears.
Matt went out into a rainstorm last night for the sole purpose of testing out the waterproof nature of this fabric. We haven’t sprayed it with any waterproofing spray and I didn’t wash it before I sewed the jacket. He stood in torrential rain for several minutes and then shook vigorously before coming back inside. The majority of the raindrops shook right off of him leaving him with a few drops on his shoulders and the rest of the coat completely dry. We noticed that the drops left on his shoulders slowly started to sink into the outer layer of fabric but they did not penetrate the middle layer (which is supposed to be the main waterproof layer within this material anyways). I think a quick spray with something like Kiwi Protect-All would fully waterproof the outer soft-shell layer of fabric.
Based on my experience with the fabric after this project (and how pro the results look…if I do say so myself!), I plan to stock a few more colors when we order our winter collection of fabrics. There is a gorgeous teal color called Ocean and a great muted blue called Storm that are high on my list. I’ve received a request for the color Plum. Do you have any specific colors in mind?

I have been steadily working on this jacket for a few weeks now with Matt eagerly awaiting it! He has been drenched in several Fall rainstorms so far with no waterproof jacket in his closet. He spends lots of time outdoors rain or shine while hiking with Luki, foraging for mushrooms or hunting so this garment is really an essential item for him.

Apparently, I’m not the only one who things sewing an anorak is a great idea this Fall! Heather Lou from Closet Case Files just launched her spectacular Kelly Anorak on October 5th. She basically read my mind with this pattern – it is unlined with all sorts of beautiful seam finishes. Like I said before, I didn’t use the lining pattern pieces for Matt’s anorak and instead drafted facings and improvised seam finishes. Now that the Kelly pattern is available it would be easy to sew a menswear anorak using the Hot Pattern pieces/menswear sizes and the instructions from the Kelly! Maybe I’ll sew a matching Kelly for myself using our Navy Dintex now that I have all the details worked out.

Now, let’s talk a bit more about the Hemmingway Windcheater pattern. I sewed the size Medium for Matt even though he usually wears a Small. We chose to move up a size to ensure there was room for lots of layering. I made a very quick and dirty mock up of the pattern to make sure that the shoulders were not too oversized (they weren’t) and, when I tried it on him, we decided to taper the side seams since Matt’s hips are very narrow and he is used to a slim fit. I made no other fit adjustments. Usually I would lengthen sleeves about 1-2″ when sewing for Matt but this was unnecessary because we went up a size.

I had fun working out all the details for this jacket. The instructions are quite brief and I didn’t follow them very often because I was not constructing the lining. This left me with lots of creative room to add cozy jersey facings:

…tonnes of flat felled seams and a facing on the hood:

…as well as a waistband casing:

I struggled finding hardware that I liked because Matt tends to like rustic or even old fashioned fastenings. We also wanted everything to be heavy duty and hard wearing. I bought brass snaps from Prym which I was very pleased with. They come with a tool set that includes a plastic holder into which you place the hole punch and various applicators.

This was very nice to work with because it kept my fingers away from the hammer and lined the top and bottom applicators up for me. Usually I feel as though I am all thumbs when working with the tiny tools that come with snaps…but not this time!

I like that these snaps are smaller in diameter than the ones that I usually see in fabric stores. These little guys are 12mm in diameter. I think this makes the jacket look more professional.

I’m considering stocking these sets in the shop. Would you be interested in using them for your outerwear projects?
I did not find toggles or draw string stops that I liked…but these will be easy to find when I make an anorak for myself! Closet Case Files released a kit yesterday that includes all of the (high quality) hardware that you need to sew an anorak. Everything would be suited to menswear except for the draw string stops (which are a beautiful scalloped design).

For Matt’s drawstring toggles, I created circular leather disks from an old belt. I traced a circle, cut it out, and then smoothed the edges with rough sand paper. I used the punch from my snap kit to create two holes in the disk and then threaded the cord through them. Hot Patterns suggested this as a solution for toggles and I love the vintage look! They slide along the cord nicely too. To finish the cord ends until I find a better solution, I just knotted the cord and melted the ends.

One of the things I really like about the design of this garment is the internal drawstring along the waist. I think this results in a more masculine and streamline look than the usual drawstring that exits near center front through an exterior grommet.

I also find the pockets with box pleats to be very practical. Matt can fit Luki’s leash in one of them no problem and they are more than large enough to keep his hands warm. I lined Matt’s pockets with leftover ripstop fabric for a pop of hidden color.

I also really love the cuff design! It includes a tab that cinches over a sleeve gusset. The pattern suggests to apply two snaps so that the cuff can be cinched tight against the wind.

You can’t see the gusset well in these photos unfortunately but there is a handy close up illustration on the front of the pattern envelope. The illustration really helped to make things clear while I sewed. It’s basically a diamond shaped wedge of fabric that gets folded in half and sewn to the cuff and sleeve to create a flared sleeve. The tab then cinches the cuff tight so that the sleeve, when done up, is no longer flared. The flare will allow Matt to put on his jacket while wearing a sweater with bulky sleeves and even while he is wearing gloves.

The hem length is perfect. There is nice coverage over the bum!

And the tall neckline is super cozy without being excessive. Matt doesn’t have to push fabric away from his face but, if he wants to hide from the wind, he can sink behind the collar a bit like a turtle lol.

The shape of the neckline where the hood meets the yoke is very unique:

It provides an interesting seamline to decorate with all sorts of topstitching. I fell a bit short here as, while I was constructing the jacket I thought this seam would usually be hidden by the hood and collar – it turns out Matt mostly wears the jacket zipped to the top leaving my one area of iffy topstitching fully exposed! Woops!

The last design element that really makes this anorak seem like a high end store bought coat from Patagonia or Arc’teryx is the flap that snaps over the zipper to protect the wearer fully from the wind. This was an essential design feature for us because I couldn’t source any of those fancy waterproof and windproof zippers that I see on expensive waterproof activewear (such as this).

Well, there you have it! Matt’s Hemmingway Windcheater that will have him ready for anything this wet West Coast winter!
Before I sign off for today, I have a couple more things to add to this already super long post!
- Have you seen the awesomely colorful Strath that Duncan Carter (a contestant on last season’s The Great British Sewing Bee) shared on the Minerva Crafts blog?
- The tissue version of the Fairfield Button-up launches next Monday, Oct. 17th! Make sure you are signed up for our newsletter because I will be sending out a special discount for newsletter recipients on Monday morning.
Have a lovely weekend!

October 4, 2019 at 9:38 am
What a lovely jacket! I am interested in knowing a bit about any interfacing you used, or did you find it wasn’t necessary? Were you able to use iron-on interfacing? Did the Dintex withstand the heat? Thanks!
October 4, 2019 at 10:27 am
Great question! If I recall correctly, I used a medium heat and a pressing cloth when applying my interfacing. Another solution could be to use sewn in interfacing and just baste it in place around the seam allowances! Here is a blog post where the sewist performed a few ironing tests on her Dintex before she proceeded. I bet it will help you out 🙂 https://stitchandfinish.wordpress.com/2017/03/03/waterproof-breathable-kelly-anorak-with-welt-pockets-and-cycling-mods/
Pingback: Bring on winter sweater fabrics! | Thread Theory
August 21, 2017 at 4:54 am
How did you go with the seams? Did you end up needing to waterproof the seams?
August 21, 2017 at 1:21 pm
I ended up leaving the seams as is – when we washed the jacket (after Matt wore it a bunch and got it dirty) I hung it to dry and then sprayed it with DWR. I gave the shoulder seams an extra coat and Matt found that stopped any seepage that was occurring! I plan to do a fresh spray about once a year at the same time that we spray our winter shoes.
August 29, 2017 at 4:31 am
That’s good to know, thanks!!
August 29, 2017 at 4:31 am
That’s good to know, thanks!!
Pingback: Dintex and Merino – Fabrics and your Projects | Thread Theory
April 24, 2017 at 3:59 pm
Awesome. Where is your store located? Do you have mail order. Love that fabric. Also the snaps.
April 24, 2017 at 5:26 pm
We are online (based out of my home studio on Vancouver Island, Canada) and we ship worldwide! You can peruse our patterns, fabrics, notions and kits here: https://threadtheory.ca/ The snaps (and other anorak hardware) are available in the kits section of the shop. This orange Dintex is currently sold out since I buy fabric in small seasonal collections but I will be ordering more (probably in different colors) next Fall. Happy sewing!
Pingback: Winter’s Last Hurrah: Knitting Sale | Thread Theory
January 1, 2017 at 5:15 am
Very impressive work!! The result looks really good on your husband 🙂 I think our husbands must be built quite similarly as all the patterns that fit Matt seem to also fit my husband without any adjustments, particularly the ones from your brand ^^ May I ask you what are Matt’s measurements, in case I find the courage to make this pattern (I have this dream of making it in navy oilskin for my husband…)? Could save me a mock up 😉 Thanks a lot and happy New Year!!
Pingback: Buffalo Check Fairfield Shirt | Thread Theory
November 3, 2016 at 8:46 am
This jacket looks great! And so functional. After reading your description of the leather tabs for securing the hood strings, I realized that my RTW jacket has the same tabs, but shaped more like an eight, which looks quite nice as well.
Lucky Matt, there’s probably a few people out there, standing in the rain and wishing they would have a jacket just like his ;-).
Extremtextil.de is a german website specializing in outdoor textiles (also for tents etc), you can switch the website to english so maybe there’s some inspiration for your shop.
Thanks for posting in such detail!
November 8, 2016 at 3:26 pm
Thanks for the link to the German shop! Wow, they sure have a nice range of outdoor fabrics. Now that you mention it, I think I’ve seen that ‘8’ shaped tab on RTW jackets too. I think the ones I’ve seen have been rigid plastic. The heavy leather I used seems to be working very nicely for Matt! He snugs up his hood often lately since we’ve had an unusual amount of wind.
October 21, 2016 at 4:00 pm
Order in !! Fairfield & Windcheater pattern on the way, along with some pumpkin Dintex. Will decide who gets the pumpkin jacket once the new colours are in. Hope there will be some more grey in stock as well. I was thinking of grey wind pants to go with the new jackets. Lol I knew I should have ordered the Dintex earlier but…. Merino❤️
October 19, 2016 at 5:54 pm
Awesome jacket! I was wondering if you need to seal the seams with this fabric to ensure the water proof-ness?
October 21, 2016 at 7:13 am
So far Matt has reported no seepage through the seams but I’ve been researching seam sealing possibilities ever since other people mentioned this on my blog and Instagram post. I won’t seal the seams on this jacket until the first drop of water leaks through because I’m very curious to find out exactly how soaking wet Matt needs to be before this occurs! In the meantime, I am making some phone calls to enquire about ordering a roll of seam sealer for our shop! I look forward to testing out how it works.
October 18, 2016 at 4:26 pm
Great jacket!! One of the first garments I ever sewed for R was a McPhee Workshop Anorak back in about 1988 just in time for the Calgary Olympics. It’s time I got around to another one along with one for me! I believe Seattle Fabric carries some waterproof zippers.
October 17, 2016 at 1:10 pm
wow! this is an amazing jacket. I would love to sew something like this for my husband. How much yardage of this fabric did you end up using? I’m tempted to make myself one in pumpkin and a grey one for my other half.
October 18, 2016 at 8:02 am
I used 2.3 meters (2.5 yards) total for this jacket. This is the recommended fabric amount for size S/M/L! They recommend 3 yards for the larger sizes. They also recommend the same amount of lining but I did not use this so this jacket didn’t end up being much of a fabric hog (which was a good thing because I didn’t want to use up all of our inventory of fabric!).
October 17, 2016 at 7:46 am
This is fantastic and is so inspiring for me to develop better sewing skills. I was thinking I might like the plum color, but I’d really love a rust or an olive color (or possibly sand/beige for better nighttime visibility to cars).
October 18, 2016 at 7:59 am
There is an excellent sand colorway which I am tempted by!
October 23, 2016 at 10:48 am
For my own safety and to support your company, then, I will just have to order some if you give in to your temptations. It does seem hard to find nice sand colorways.
How well does the inner mesh layer slide over clothing? I’m mainly wondering how smoothly the unlined arms would move over sweaters or long-sleeved shirts.
October 24, 2016 at 2:24 pm
The mesh is definitely smooth enough to slide over sweaters. It is a very similar mesh to what you will find in most unlined hiking jackets (such as Gortex ones). I’m ordering this week! We will see how many colors I can afford to add to my shopping list!
October 17, 2016 at 2:53 am
Awesome work! This coat is 100% the real thing. Lucky Matt.
October 16, 2016 at 8:21 pm
Amazing Anorak forMatt, love the colour and I could do with one of these for dog walking . I can see my hubby in this as well, but more likely the Storm or Ocean. Also thank Matt for standing out in the torrential rain, waterproof fabric has had me drenched to the skin in minutes so good to know this is much better.
October 16, 2016 at 4:23 pm
I am also excited to see what other colors you add this winter. I really want to make this coat and also the Kelly Coat from Closet Case. How soon do you think you’ll have the Teal and Storm? Also, would you consider a Forest Green, Russet, or Deep Orange?
October 16, 2016 at 5:25 pm
Yes to all these colours! Plum! Teal! Deep orange! Need them all 😀
October 18, 2016 at 7:59 am
Great color ideas! I will keep them in mind :). I plan to have the new colors in our shop by mid December at the latest (I will be ordering them in early November).
October 16, 2016 at 1:03 pm
This is gorgeous! I’m so glad to see it made up! I made it for my husband a few years ago and he loves it. I am going to have to take your lead and use a lightweight fabric like this and make another!
October 18, 2016 at 7:58 am
Oh neat! I would love to see how yours turned out! Did you blog about it somewhere? What sort of fabric did you use?
October 16, 2016 at 11:46 am
This jacket is amazing! The fit, the colour, the finishing details – all of it! It would be great if you could stock the hardware needed for making Anoraks. And I see I’m not the only person who would love to see some plum fabric. But now that you’ve mentioned there’s a muted blue I’m feeling torn. When do you think you can have the new colours available in your shop?
October 18, 2016 at 7:57 am
I’m hoping to make the fabric order by early November so that the new fabrics will be in our shop by mid-December at the latest!
October 15, 2016 at 12:15 pm
This jacket looks sensational and so practical for our west coast weather. I especially love the shape of the neck/collar and hood. How would you adapt this pattern to fit a woman? Shortening the arms and narrowing the shoulders, I guess??? I love the idea of pairing this pattern with your Dintex fabric for a lightweight, waterproof layer. My sewing brain is whirring now! Thank you for the inspiration…
October 18, 2016 at 7:56 am
Hmm, I think my main adaptations would be to narrow the shoulders quite a bit and raise the waist ties to the natural waist height. They are fairly low on Matt so they do not create an hourglass figure when pulled snug. And yes, the arms would need to be shortened considerably because they are quite long! I don’t think you would need to add room to accommodate the bust because it is a boxy jacket but it would certainly be important to choose your sized based on the chest measurement. Or: It’s a pretty great unisex jacket without any fit adjustments if you like the drop shoulder/relaxed fit look. It all depends on your fit preference!
October 15, 2016 at 12:11 pm
I just bought the Kelly anorak pattern and have been looking for the perfect waterproof fabric for it. I’ll keep an eye out for your Dintex shipment because that really sounds perfect!
October 15, 2016 at 8:07 am
This is such a professional and beautiful jacket, Morgan! You SHOULD be proud of yourself! Matt is one lucky guy! I love seeing the things you make!
October 15, 2016 at 7:10 am
Cannot wait for the new teal and storm colors of the Dintex, and will make Sewaholic’s Minoru jacket. In the meantime, I will work on my sewing queue. Thanks for the thorough review of your process.
October 18, 2016 at 7:51 am
It would be a great choice for a Minoru. A couple of years ago I sewed myself a Minoru in a soft shell fabric which was stiffer, less waterproof, and generally lower quality but I’ve been so thrilled with how it has held up over time. I need to give it a waterproof spray this year to refresh it but otherwise it still looks more or less like new. I wear it almost every day in Spring and Fall! Here is my post about it: https://threadtheoryblog.wordpress.com/2014/11/28/finished-minoru-jacket/
October 14, 2016 at 1:02 pm
Wow this is amazing!! If you can have a dark plum/eggplant colour, I will buy it for my Kelly Anorak. Maybe Navy or olive for the husband? But this orange is really nice too. I would definitely buy snaps and hardware kits from you too.
October 18, 2016 at 7:48 am
Thanks for the feedback on color! Looks like I will be stocking plum 😀 We have navy already and will re-stock this as I think it may be close to selling out. Olive is a great idea! It’s always my favourite color choice for anoraks.
October 14, 2016 at 10:47 am
I love love love this! I just bought the Kellie pattern from CCF, so I’m happy to see this. You should definitely stock those snaps, and also if you find any toggles that you like, too! And plum waterproof fabric sounds like a brilliant idea to me. Haha, I’m really excited about making a waterproof jacket for myself now!
I was upset when I read the bit about the leash fitting in his pockets, thinking that you can’t mention a dog without showing him too! But I see now you do have a couple of photos of Luki. I think you should include more photos of him next time! 😉
October 18, 2016 at 7:47 am
Oh dear, I’m a bit of a tease, aren’t I! Sorry about that…I never thought I would be the one to withhold photos of Luki! Here is a better look at him achieving full levels of cuteness: https://threadtheoryblog.wordpress.com/2016/02/10/camas-sew-along-closures-and-styling/ (Scroll to the middle of the post where he is accepting kisses!)
October 14, 2016 at 10:41 am
Jeepers – that is absolutely, mind-blowingly amazing! Truly one of the most inspiring things I’ve seen on a sewing blog. Thanks for sharing!
October 16, 2016 at 12:40 pm
I was thinking the same thing. Such an impressive make.
October 18, 2016 at 7:44 am
Thanks very much to both of you! 🙂
October 14, 2016 at 9:43 am
Amazing. What a great west coast jacket. As a vancouverite, making rain gear is on my bucket list. Did you do anything to seal the seams?
October 18, 2016 at 7:43 am
No I didn’t! Matt reports no seepage so far but I have been looking into seam sealing options. Matt is loves hammock camping and sewing his own DIY camping gear so he has done quite a bit of research on applying watered down caulking to tarp seams. That is one option I’m interested in but I may just buy seam sealant by the roll and apply it to the interior of the jacket for a more professional finish. For now though, I am going to wait until Matt reports the first bit of seepage because I am curious to find out how long he needs to be in the rain before sealing becomes necessary.
October 18, 2016 at 9:15 am
I look forward to hearing the results of that experiment. Are you going to stock rolls of sealant or do you have a go to canadian source?
October 14, 2016 at 8:55 am
What a gorgeous jacket – my husband would love it too and I’m sure Matt really appreciates all the work you put into this loving project – is there anything BETTER than having a custom made rain jacket on Vancouver Island? 🙂 Especially as you said these past few days and the next few as well. I actually wore my gortex this morning for my walk along the beach and those darn pants are a little snug – maybe a nice pair of Dintex pants are in my future 🙂 I could make them to fit! How is Dintex different from Gortex? Are they the same just a different brand name?
October 18, 2016 at 7:41 am
I think that Dintex and Gortex are very similar concepts (a waterproof, breathable, windproof membrane sandwiched between two layers) so I imagine the main difference is the brand name/copyright. There are a number of companies that produce these sorts of membranes since the main Gortex patent is expired. Lucky for us!
October 14, 2016 at 7:43 am
Your jacket looks great! It was fun reading through the steps. FYI, Rose City Textiles in Portland is my go to source for fabric and findings for outerwear. Unfortunately they just announced they are going out of business, but I thought you might score some deals. I think you do have to order in bulk but it might be worth checking out. The woman (Annette) who works there is a walking encyclopedia for all things outerwear.
October 18, 2016 at 7:38 am
Thanks so much for this info Colleen! That is sad that they are going out of business but I am lucky to find out about them before they do. From what I can tell on their website, they look to be a mecca of outerwear fabrics and hardware.