


Let’s say you have just sewn up a muslin of the Jedediah Pants or Jutland Pants pattern (or any other trouser pattern) and notice strain lines radiating from the fly of the trouser when you try the muslin on. The trousers seem to pull and bind between the legs and are generally tight feeling and restricting across the stomach and upper thighs. Don’t worry, this fit issue can be overcome! Here is how:
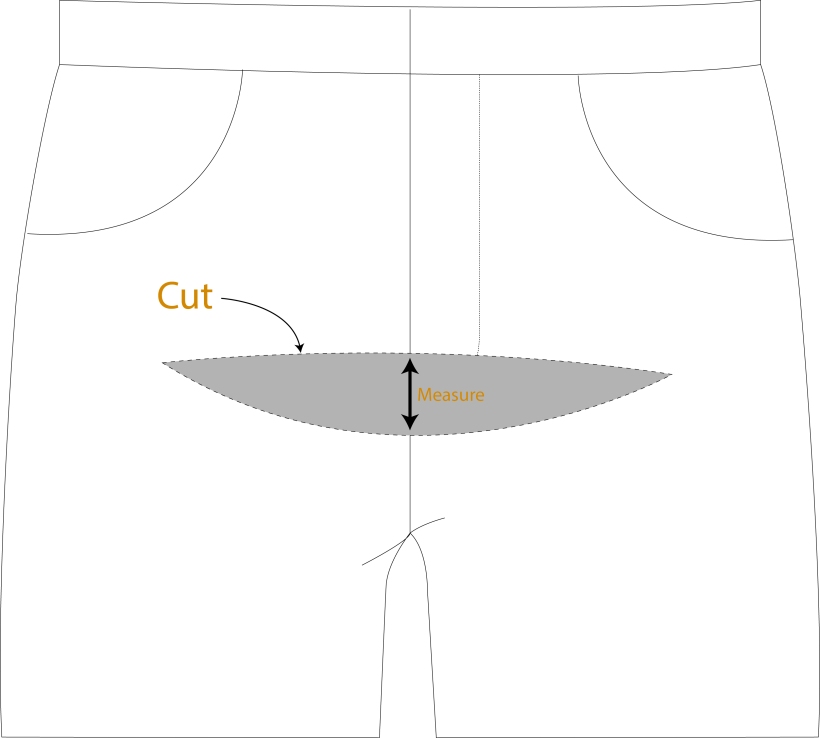
With the muslin still on the wearer, cut a horizontal line through the center front of the crotch. The fabric will release the tension and you will be left with a smile shaped gap. Measure the widest point on this gap – this is the total amount you will need to add to the crotch seam so that there will no longer be strain lines.
There are two common pattern alterations that you can try to add this measurement to the crotch seam. The first common and quick fix to try is to simply lengthen the crotch depth by slashing across the pants front at the hip and adding the appropriate amount of length. This simple pattern alteration maintains the shape of the crotch curve but just makes it a little longer.

If you try this pattern alteration and it does not seem to work for you (for instance, your new muslin now looks like you are wearing drop crotch pants!), this is likely because the fit problem isn’t about the crotch depth being to short for you. Instead, the problem is that the crotch circumference is too narrow and the seat seam curve does not suit the shape of your body. This may be because your abdomen is slightly more rounded than the fit model’s shape or it could be due to roundness in the crotch caused by specifically male body parts! Either way, you will need to perform a slightly more complicated alteration to your pants front pattern piece.
Here is how to add crotch circumference:
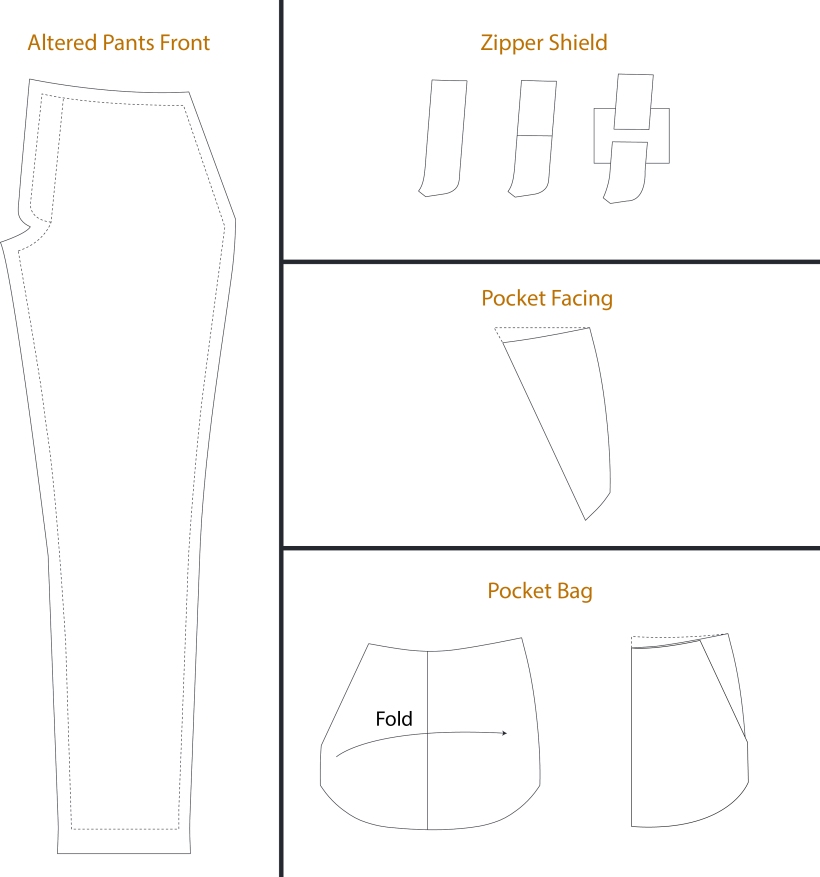
1. Mark all the seamlines on your pants front pattern piece. The seam allowance included within the Jedediah Pants and Jutland Pants patterns in 5/8″. When performing alterations to a pattern piece you need to work from the seamline (where you will actually be sewing) rather than from the edge of the pattern piece so that you will retain the original shape of the pattern.

2. Draw a horizontal line across the hips of the pant front pattern piece. Slash along that line from the fly front to just before the side seamline – don’t cut all the way through the seamline and seam allowance because you will need to leave a little bit of paper here to act as a hinge. Now cut into the seam allowance without removing that tiny paper hinge.
3. Draw a line from the inseam seamline at knee level up to the crotch seam. Try to end your line somewhere before the fly extension curve. Cut from the crotch seam down to the inseam at knee level and again leave a little hinge of paper at the seamline. Cut into the seam allowance on a diagonal without removing that tiny paper hinge.

4. Spread the two slashes slightly so that the crotch seam extends to the left and the waistline swings upwards. You will notice that the little clips you made into the seam allowance will allow the seam allowance to overlap as you spread the pattern. When measuring along the seamline (not the edge of the pattern piece), the total size of your two gaps should equal the measurement that you found when you cut across your first muslin.

5. Secure your spread pattern piece in place by taping the pattern to a couple new sheets of tissue paper. Smooth the curve along the crotch seamline and smooth the seam allowance to match.
6. Depending on the pattern you are using, you will likely need to adjust a number of other small pattern pieces to suit the changes you made. These will likely include the pocket pieces and facings and the fly shield. The easiest way to make these changes is to line up the paper pattern pieces underneath the pants front pattern and trace the new angles onto the pocket. Lengthen the fly shield to match the new length of the fly facing.
*** If you are experiencing lines radiating from center back across the bottom and the pants seat seems generally too tight and flat for the rounded shape of your body, the same alteration can be applied to the pants back. Slash and spread along several points at center back – try to pick points along the seat seam where the seam seems to least match your body.

August 24, 2020 at 3:05 pm
When it comes to pants that are already made, you can consider a gusset, a diamond shaped piece of matching cloth inserted where the crotch seam crosses the legs seams.
May 27, 2017 at 3:48 am
I just recently found your blog and it is the most informative one for me, helping me to learn how to make these corrections in the crotch area on ladies clothes construction. I’ve been sewing for over 50 years and still have problems fine tuning the fit in the crotch area. Can you explain to me how to make this one final adjustment to my pattern. I have taken the shape and length of my entire crotch bowl area using a flexible ruler. Now how do I use that hard copy of my shape and use it to adjust my back pattern piece to fit me. I am stuck at this point because the shape of my crotch bowl isn’t perfect (whatever that is) instead it needs widened front and back as compared to the pattern bowl. I hope I have explained clearly the problem I am having .
May 29, 2017 at 12:59 pm
Hi Theresa,
I think I can point you in the right direction! Have you found this excellent tutorial? http://www.freenotion.com/blog/2016/4/30/tutorial-the-seat-seam-adjustment It explains exactly how to transfer your body’s shape (using a flexible ruler) to your pattern. Please let me know if you have any questions after reading this!
Good luck,
Morgan
February 6, 2017 at 11:33 am
Does not answer question re ready-made slacks
February 6, 2017 at 4:38 pm
No, this post does not! It was intended, as part of my menswear sewing blog, to show how to add room to a trouser sewing pattern (not finished store bought pants). The adjustments I describe should be done to the paper sewing pattern and not the pants themselves.
December 20, 2016 at 6:42 am
I need to enlarge crotch area and the back seam and crotch seam is already ripped. Can you tell me ow to do this from the back side. These pants have an elastic waist and are red velvet.
December 21, 2016 at 8:41 am
I haven’t received an answer to my question but that’s OK. I was able to make the adjustment when I read I just needed to follow them using the back of the pants – its all good.
December 21, 2016 at 9:52 am
Hi Marie, That’s great you were able to do your adjustment successfully! I am not quite sure I understand the description of your situation so I’m not sure I could have helped you accurately and am glad that you found a solution that made sense to you 🙂
December 17, 2016 at 4:40 am
Thank you. I have been givearn a whole wardrobe of stretch jeans and other pants/shorts/etc and many are a tad smaller than me, but in good condition. So I have been looking for a way to adjust the crotch area and your advice has been wonderful. Off I go to snip and increotase some crotches. Thanks heaps.
December 17, 2016 at 9:33 am
Before you snip! When I created these tutorials I was intending them to be used on sewing patterns and not on finished pants – the pattern is adjusted and then the fabric is cut from the adjusted pattern and sewn in to pants. If you snip your finished pants you will create a very visible hole! To add more room to finished pants I would recommend adding a gusset at crotch where the inseams meet. This is the least visible spot to add more fabric.
October 17, 2015 at 9:10 pm
Wonderful. thank you. I am now going to cut into my trouser toile, which has been waiting for me to take the next step since 2012
March 24, 2015 at 3:56 pm
Ah, interesting method for lengthening the front crotch point. And it doesn’t actually change the crotch curve shape at the…affected area, which is what I was worried about. I’m off to the sewing table to give it a try!
March 22, 2015 at 7:18 am
Just a question about the first method. Does that not change the fit of the side seam between front and back?
March 23, 2015 at 3:05 pm
Oh yes, I forgot to mention that! The back would also need to be lengthened accordingly! Thanks for pointing this out Sue 🙂
March 21, 2015 at 5:59 am
Thank you for this information. I am on a pants kick right now trying to get the perfect fit, and they are very tricky! I will have to try this out 🙂
March 20, 2015 at 12:48 pm
Totally smirk-worthy and completely informative! Thanks!