

Today, for the Jutland Sew-Along, we are talking about fit. While fitting men is usually far easier than fitting women, as their body structure generally includes less curves, there are still a number of fit issues you might come across in your pants sewing process.
I want to point out a number of things before we get into the nitty-gritty of fitting. First off, it might not be necessary to immerse yourself in the world of fitting if you find it too intimidating. Sewing should be fun! By taking accurate body measurements (as I detailed in this morning’s blog post) and choosing your size accordingly, you will likely end up with pants that fit as well as store bought pants. If you want to enjoy sewing, simply make the process as involved as you feel like for each project :D. Try one or two new fitting techniques with each garment and don’t attempt them all at once. This will make the pursuit of a perfect fit far more achievable!
I’m not an expert:
Next up, I want to point out that I don’t consider myself a menswear fitting expert. This is due to couple factors – the first being the size and shape of all the men I have ever sewn for. They almost all happen to be thin and lanky! Thus, my practical knowledge of fitting men is limited to the adjustments necessary for this body type. Also, I’m still pretty young! I like to think of fitting knowledge as something that accumulates a bit like a snowball. Each time I read something or sew something or take a course, one more element of fitting knowledge sticks on to my growing snowball of experience. This will keep growing all my life and I am doing all in my power to increase it’s size as rapidly as possible…but the reality is, I’ve only had a few years experience of fitting the garments I sew.
Okay, with those caveats aside, lets move on to discuss fitting. I have read and heard many different approaches to fitting. Some people tissue fit a pattern by placing the actual tissue pattern pieces against the wearer, some people sew a first mock up of the garment without any alterations before beginning to fit, other people baste together the actual garment pieces and perform fit adjustments straight on the actual garment fabric.
Here is my approach to fitting:
- I take the relevant body measurements and compare them to those included in the pattern.
- I then measure one of the man’s existing pairs of pants that as closely as possible match the style of the pattern I am sewing. I take measurements such as the rise, waist width, hip width, thigh width and inseam length. I examine the fit of these existing pants on the man to see if there are issues with the store-bought fit.
- I then compare all the measurements I took (both body and garment measurements) to those provided in the pattern and choose a size mainly based on the waist and hip/seat measurements. I then know that I will need to adjust the fit of any areas where the measurements I have and the measurements the pattern provides differ greatly.
- Next, I make any major adjustments to the tissue pattern (see the videos at the bottom of this post as they demonstrate some of the main adjustments I would make).
- I sew a pair of the pants using a cheap fabric that is the approximate weight and fabric content of the intended final pair of pants. This first pair, using cheap fabric, serves as a wearable mock-up which will familiarize me with the sewing process for this garment and which I can examine on the man to see if any other changes to the fit will be necessary for the final pair.
- Lastly, I sew up the final pair and make sure to note all changes I made to the original pattern so that future pairs can be sewn quickly and without worry of fit issues!
Some Fitting Techniques for Men’s Pants:
I’ve created a chart for you to refer to once you’ve created your first muslin/wearable mock-up of the Jutland Pants (or any other men’s pants pattern). Take a look at the numbered areas in the diagram below and treat them like a checklist. Are there any strange drag lines or folds of fabric visible?

I’ve made some rough illustrations showing what the fitting issues might look like. Beside each illustration is a suggestion for fixing this problem. Almost every fitting book/video/expert has a different approach to fixing certain fitting problems. I’ve selected the techniques I prefer to use (or, if I haven’t used them myself, I’ve selected the method that seems simplest and the most likely to fix the fit issue if you don’t have advanced knowledge in pattern manipulation).
Keep in mind that this is a work in progress and some tutorials are not yet available! Please let me know if I am missing any fit issues that you would like included here:


Resources: Large Abdomen Adjustment video
Resources: Hip Shape Adjustment Video, Grading Between Sizes tutorial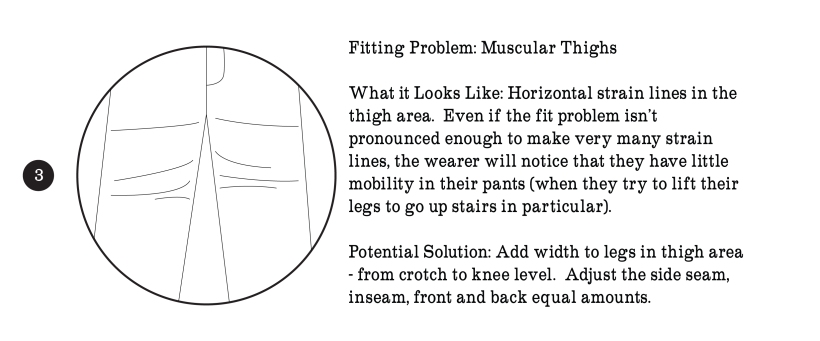

Resources: Making Shorts video and the How to Lengthen or Shorten a Pattern tutorial

Resources: A tutorial is currently in the works! In the mean time, have a look Colette’s excellent take on this adjustment. The method I use is a little simpler but doesn’t spread the changes to as many areas in the crotch curve.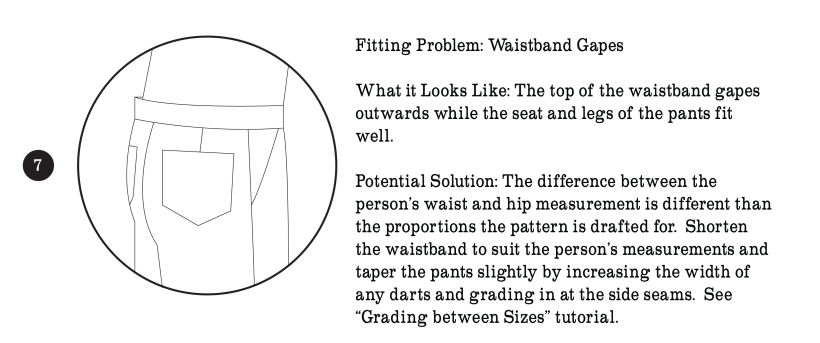
Resources: Grading Between Sizes tutorial
Resources: A tutorial is currently in the works! In the mean time, have a look Colette’s excellent take on this adjustment. The method I use is a little simpler but doesn’t spread the changes to as many areas in the crotch curve.

Resources: Tutorial in the works! In the meantime, it really is quite simple! Just draw a different crotch curve that is either steeper or shallower. Make small adjustments – a little goes a long ways. Use a curved ruler or eyeball it :P.
I hope you find this chart helpful! I’ll be updating the blog with the upcoming tutorials as I have a chance to make them.
In the meantime, check out these (silent!) videos.
- We made a video about adjusting the width of pant legs that isn’t referred to in any of these fitting diagrams, so be sure to check that out if the man you are sewing for would prefer narrow Jutland Pants or more straight-legged Jedediah Pants!
- Also, you might like to watch our video on creating shorts from a pants pattern. I make a lot of hand gestures which you might not understand (since we removed the sound) – but most of them refer to the fact that you will likely need to move the cargo pockets up since the new hemline will potentially be higher than the bottom of the cargo pocket!
I would really love to hear about the fitting techniques and resources you find to be most useful. Do you have a different approach to a fit problem than the ones I’ve chosen and explained?

December 3, 2014 at 5:24 am
I anticipate a pinning frenzy with these fitting tips! Thanks so much for making these diagrams – I’m sure they’ll come in handy as I tackle making for my man.
December 3, 2014 at 8:48 am
I hope they will 🙂 I’m guessing you’ll find the alterations you need to make are pretty simple and minimal compared to fitting issues you are used to after becoming so familiar with women’s fitting issues when making the Ginger Jeans :P. Good luck!
December 2, 2014 at 6:06 pm
Quick question — How does the Jutland fit compare to the Jedediah? I’m planning to make the Jutland for my husband for Christmas, and making a muslin would ruin the surprise! I’ve made him two pairs of Jeds which fit him well — the only alteration I made was to lengthen the crotch slightly. Do you think I should make the same alteration on the Jutland? Thanks 🙂
December 3, 2014 at 8:47 am
Hi Sara, Good luck with your secret Christmas sewing! Ideally I would recommend making a separate mock-up for the Jutland Pants but, since that obviously won’t be possible, here are a few notes about fit for you:
– The rise of the Jutland and Jedediah Pants are approximately the same (not exactly but both are higher than ‘low rise’)
– The fit of the hips is far different in both patterns – the Jedediah Pants are slightly curved to accommodate the tighter fit in the upper thighs while the Jutland Pants are a straight fit.
– I’d recommend laying the Jedediah and Jutland Front and Back pattern pieces out to compare the crotch curves before making the alteration you mention. Lay the Jedediah Back on top of the Jutland Back to compare and repeat this for the front. I am guessing you will need to do the same alteration but I would love to hear what you decide!
I hope this helps,
Morgan