Thread Theory

Welcome to the new era of menswear sewing. Go ahead and create something exceptional!


2 Comments

Comox Trunks Saxx Hack Idea (i.e. how to add a hammock pouch)

Whitney Decker Comox Trunks 2

Recently, Whitney Decker posted some great photos of her husband’s customised Comox Trunks to the Thread Theory Sewing Community Facebook group.  I was thrilled to see the fit she achieved as well as her detailed shots of the hammock pieces that she added to the front of the trunks.

Whitney Decker Comox Trunks

These hammock pieces are similar to what you might find in Saxx Underwear which are a brand renowned for their ability to keep everything in it’s proper place.

I asked Whitney if she might like to create a tutorial for the Thread Theory blog since I have received many requests for this alteration over the years…well, it turns out she had already gone to all the work of creating both a video tutorial and a photographed tutorial of both the Saxx hack and all her other fit alterations!  She posted these tutorials on the Phee Fabrics blog.

Whitney Decker Comox Trunks 3

Her video is very in-depth so I recommend watching this first and then cementing the knowledge you have gained by reading her tutorial next.  The video is of course useful because it details the Saxx hack but it would also be great to watch just to familiarise yourself with how the strangely shaped Comox Trunks pieces fit together.  If you are unclear on how to add length to the legs, how to change the width of the gusset or all manner of other alterations…don’t worry, her video covers them all!


Whitney even switches out the elastic waistband and replaces it with a comfortable Supplex waistband.  Supplex is a performance stretch fabric that is available at Phee Fabrics (the company which Whitney created her video and blog post for).  I hadn’t come across this fabric company before but I’m glad I have now!  They look like an excellent source for performance knits and underwear/swimwear fabrics.  Their blog features tutorials for almost every indie underwear pattern I’ve ever come across!

Whitney’s pattern hack uses a free pattern piece offered by another indie pattern company with a men’s underwear pattern: The Boxerwear Boxer Briefs by Stitch Upon A Time.  This pattern is similar in fit to the Comox Trunks with a few key differences: The pouch is one piece and shaped with a dart, there is a centre back seam, I believe the legs are finished with binding or a band, and the legs are quite a bit longer.  It’s wonderful that there is beginning to be enough variety available that you can pick and choose menswear patterns to perfectly suit the style and fit you are looking for!  Here’s a photo of the Boxerwear design followed by the Comox Trunks so you can compare the many differences and pick the pattern that suits your needs best:

Stitch Upon A Time Boxerwear

From what Whitney tells me, it sounds like the free Saxx-style hammock pattern piece is available through the Stitch Upon a Time Facebook group (please correct me if I’m wrong as I haven’t joined the group!).  I think it would be fairly straightforward to come up with your own hammock pattern piece by tracing the curve of the Comox Trunks front pouch and then drawing a straight line for the hammock edge.

Amy Lawson Comox Trunks

Amy Lawson did something similar and posted to our Facebook Group too.  Has anyone else tried this hack?

Have a look at the Comox Trunks pattern >


Leave a comment

The Bifold Wallet Tutorial

Wallet Sewing Pattern Tutorial-40-2

Today I’m going to walk you through the construction of our new Bifold Wallet sewing pattern.  Of the three wallet designs in our shop, this one is the most complicated – but don’t worry, it is still perfectly suitable for a beginner sewist and it is certainly a very quick project for someone with experience!

We will be creating the fabric variation complete with the optional zippered coin pocket today.  This way you can have a set of photos and extra tips to help you through the trickiest details.  If you are absolutely new to sewing, I would recommend giving the Felt & Specialised Materials variation a try first.  If you prefer to sew the Fabric variation, consider leaving the zippered coin pocket off on your first go.

Let’s get started!

Wallet Sewing Pattern Tutorial-1

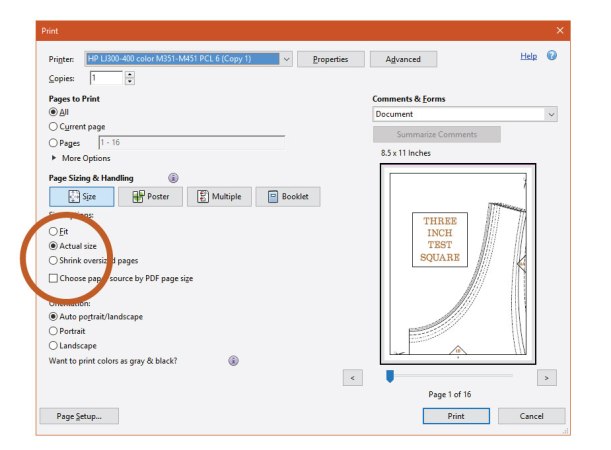
Print your PDF pattern as instructed within the Read Me First document.  If you need extra help determining the correct printer settings, have a look at our PDF Pattern tutorial.Wallet Sewing Pattern Tutorial-2

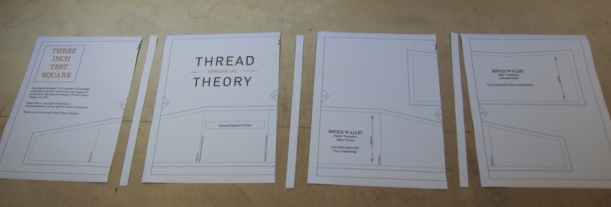
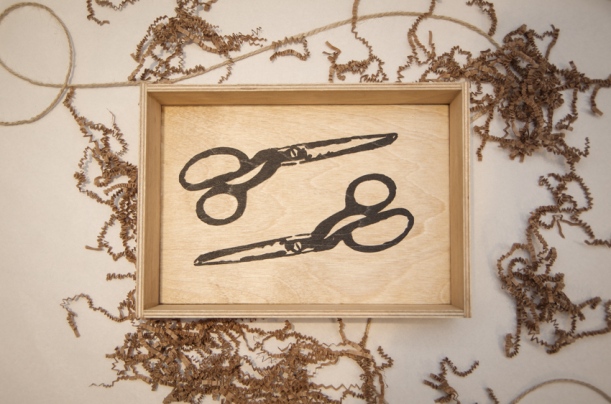
Cut the right hand margin off each page – there are little scissors pictured along each margin to show you where to cut.Wallet Sewing Pattern Tutorial-3

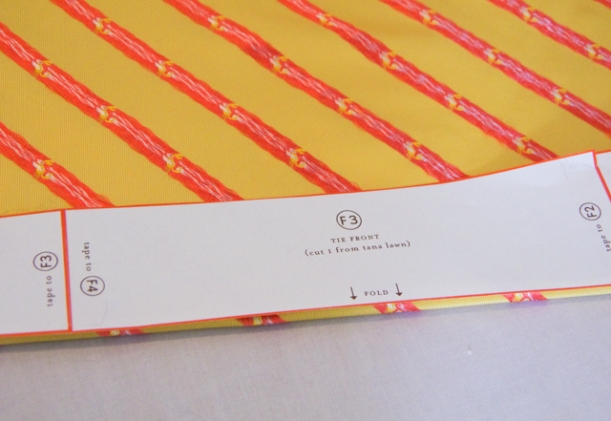
Align the numbered and lettered triangles so they make a perfect diamond and connect the four pages with either glue or tape.

Wallet Sewing Pattern Tutorial-4

Cut out the pattern pieces so that they are ready to use:

Wallet Sewing Pattern Tutorial-5

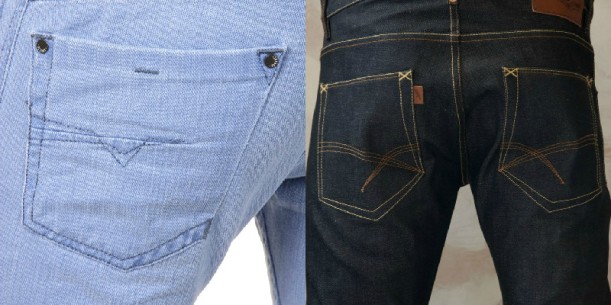
For this wallet project I am using a scrap of cotton shirting fabric.  If you are new to sewing you might like to choose a light and stable fabric such as cotton shirting or quilting cotton.  You can also select a large range of other woven materials such as sturdy canvas, linen, or even flannel.

Wallet Sewing Pattern Tutorial-6

Iron any creases out of your fabric and fold it in half.  Place the Main Wallet pattern piece on top of your fabric and either pin it in place to cut around or trace it with chalk or another marking implement.

Wallet Sewing Pattern Tutorial-10

For the optional Contrast Insert, I have chosen a scrap of lightweight cotton batiste.  Sewing wallets sure is a great way to use up small leftovers from bigger garment projects!

Wallet Sewing Pattern Tutorial-8

Fold the fabric in half to create two layers just as you did for the Main Wallet.  Trace or pin the Contrast Insert.

Wallet Sewing Pattern Tutorial-9

Since my main plaid shirting is so light-weight, I chose a very stiff sew-in interfacing for this project.  You can choose between medium or heavy weight interfacing to suit your fabric choice.  If you are working with a stiff canvas you will not need a sturdy interfacing to provide structure but if you are working with a lightweight fabric like mine you will need to rely on the structure of the interfacing to create a wallet with substance and strength.  Both fusible and sew-in interfacings will do the job!

Wallet Sewing Pattern Tutorial-11

Cut out all of your fabric pieces – you should have two main wallet pieces, one interfacing piece, and two contrast inserts.

Wallet Sewing Pattern Tutorial-13

Apply your interfacing to the wrong side of one of your main wallet pieces – it doesn’t matter which one!  If you are using fusible interfacing you will need to iron the interfacing on to the fabric.  I am using sew-in so I stitched my interfacing to my fabric within the 1/4″ seam allowance:

Wallet Sewing Pattern Tutorial-14

Now is a good time to transfer the Main Wallet markings on to the fabric.  Transfer them to the interfaced piece.  Here is how I like to do this:

Wallet Sewing Pattern Tutorial-15

Lay the fabric on your work surface with right side up.  Lay the paper pattern piece on top.  Shift the pattern piece up slightly (as photographed above) and continue each fold line onto the fabric with chalk.

Wallet Sewing Pattern Tutorial-16

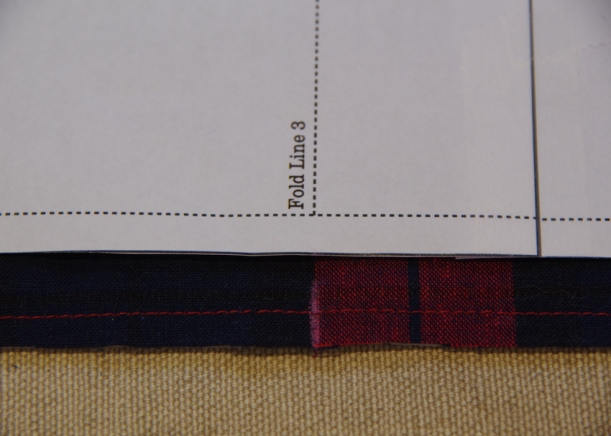
Repeat this process on the top edge of the wallet by shifting the paper pattern piece down:

Wallet Sewing Pattern Tutorial-17

Use a ruler to connect the two vertical lines.

Wallet Sewing Pattern Tutorial-18

Transfer the zippered pocket markings by placing a pin through each corner.  The pin is piercing the paper pattern piece and the fabric.

Wallet Sewing Pattern Tutorial-19

Flip the pinned pieces to the interfaced wrong side so you can see the sharp ends of the pins poking through.  Place a new pin exactly where the sharp ends pierce through the fabric.

Wallet Sewing Pattern Tutorial-20

Here’s how this looks from the other side when you’ve finished adding pins:

Wallet Sewing Pattern Tutorial-21

Now remove the paper pattern piece and the first set of pins by pulling the paper off of the fabric.  You will be left with the sharp ends of four pins sticking up:

Wallet Sewing Pattern Tutorial-22

Now use a ruler and chalk to “connect the dots” between the pins.

Wallet Sewing Pattern Tutorial-23

Prepare to add the zippered coin pocket by adjusting your stitch length to very short and trace the chalk marking with stitches.

Wallet Sewing Pattern Tutorial-24

These stitches will prevent the zipper window from becoming stretched and misshapen during the next steps.

Wallet Sewing Pattern Tutorial-25

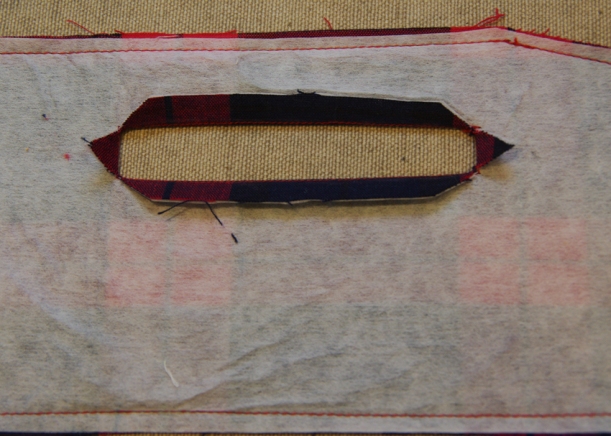
Slice open the zipper window by cutting horizontally along the middle of the window.  Stop approximately 1/4″ to 1/2″ from both sides.  Cut the shape of a Y towards each corner.

Wallet Sewing Pattern Tutorial-28

When cutting in to each corner, clip as close to the stitching as you can without actually cutting through the stitching.  The closer you manage to cut to the stitching, the more square and precise your window corners will become.

Wallet Sewing Pattern Tutorial-27

From the wrong side of the wallet, press the zipper window open.  Take your time with this pressing to ensure the stitching is not visible from the right side and that the corners are square.

Wallet Sewing Pattern Tutorial-29

Now it is time to add our zippers!  The zipper window is 3 3/4″ wide so we need to shorten our zippers to suit the window.  If you are new to inserting zippers you might like to work with a plastic zipper for your first go as bulky metal teeth can make it tricky to create neat topstitching.

Wallet Sewing Pattern Tutorial-31

Begin your zipper preparation by closing the zipper and hand sewing the top of the zipper closed.  This isn’t necessary but it is very helpful because you will need to open your zipper during the sewing process and the stitching will keep to top of it from splaying open while you stitch.

Wallet Sewing Pattern Tutorial-33

Measure 3 3/4″ (9.5 cm) from the top of your zipper to find the new end.  Stitch around the zipper teeth by hand to create a new zipper stop.

Wallet Sewing Pattern Tutorial-34

Trim off the excess zipper tape.  If you are using a metal zipper you may want to use pliers to remove excess teeth so that you don’t have to worry about breaking a needle when you sew over them.  Alternatively, you can use precise scissors to cut the teeth off.

Wallet Sewing Pattern Tutorial-35

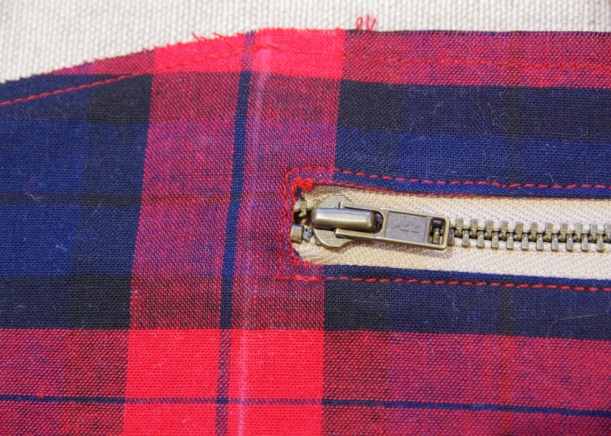
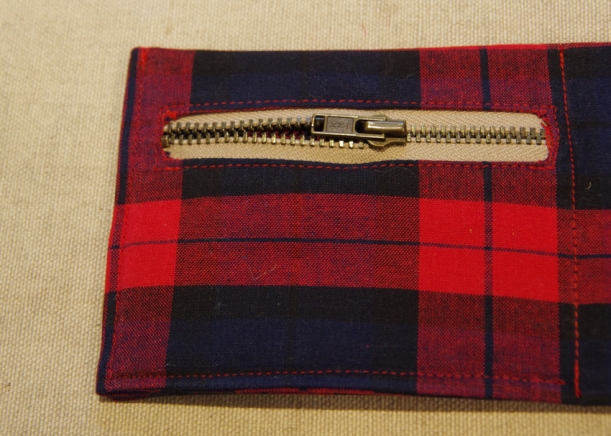
Place the zipper under the zipper window and pin in place.  Make sure that the zipper teeth are centered in the window and that your hand stitched zipper stops are not visible.  Fiddle with the window until none of the staystitching is visible (add as many pins as you like!).  As you can see below, my window corners need some more fiddling and pinning:

Wallet Sewing Pattern Tutorial-37

Using a narrow zipper foot on your sewing machine, topstitch around the zipper window.  Take your time at either end of the zipper and possibly hand crank the machine to ensure your stitching is straight as you go over your zipper teeth.  Also, open the zipper when you reach the zipper pull so that it is out of the way and does not interfere with your straight stitching.

Wallet Sewing Pattern Tutorial-39

Once you have finished your toptsitching take a look at your corners to see if you are happy with how they turned out.  If you see too much staystitching and your corners are not square, you may want to rip out your stitches and try again.

Wallet Sewing Pattern Tutorial-41

If you have used a plastic zipper, you have the option to cover up the two messy ends by creating a buttonhole stitch (a zig zag stitch with a very short stitch length) along the left and right sides of the window.  If you have used a metal zipper you do not have this option because it is impossible to zig zag over the metal zipper teeth.  Don’t stress yourself by aiming for perfection, by the time the wallet is finished small glimpses of staystitching will not be very noticeable!

Wallet Sewing Pattern Tutorial-42

Now we are ready to assemble the main wallet.  Begin by placing the two main wallet pieces right side together and pinning.

Wallet Sewing Pattern Tutorial-43

Stitch around the entire wallet leaving a 4″ opening along the bottom so that it can be flipped right side out.  The extra row of stitching in the photo below is the basting that attached my sew-in interfacing to my main fabric.

Wallet Sewing Pattern Tutorial-45

Here you can see the 4″ opening along the bottom:

Wallet Sewing Pattern Tutorial-47

Trim one seam allowance shorter than the other if you are using a bulky fabric.  Since my interfacing is very stiff and bulky, I trimmed it extensively.

Wallet Sewing Pattern Tutorial-49

Clip across the corners so that they are easier to turn right side out without bulk and bunching.

Wallet Sewing Pattern Tutorial-51

Flip the wallet right side out through the 4″ opening.  I used a point turner tool to ensure all my corners were nice and crisp.  You can also use a pencil or chopstitck for this job!

Wallet Sewing Pattern Tutorial-52

Give the wallet a careful press and press under the seam allowances on the 4″ opening.

Wallet Sewing Pattern Tutorial-53

Handstitch the opening closed:

Wallet Sewing Pattern Tutorial-55

Close the side of the zippered coin pocket by topstitching down the center of the wallet.

Wallet Sewing Pattern Tutorial-64

The left side of the coin pocket will be closed by more topstitching later.

Wallet Sewing Pattern Tutorial-65

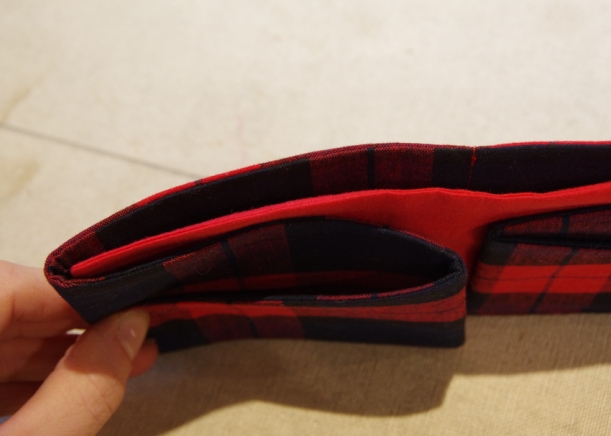
Now let’s make this long strip of fabric actually look like a wallet!  Begin by pressing the wallet in half (in the picture below the zippered coin pocket is against the work surface.

Wallet Sewing Pattern Tutorial-56

Open the wallet back up and press along fold line 1.

Wallet Sewing Pattern Tutorial-57

Open it back up and then press along fold line 2.

Wallet Sewing Pattern Tutorial-58

Press along fold line 3 and 4 so that the slanted card slots slope down towards the side of the wallet.  Notice that there is a small gap at the spine of the wallet – this is to reduce bulk in the middle of the wallet so that it can close flat easily.

Wallet Sewing Pattern Tutorial-59

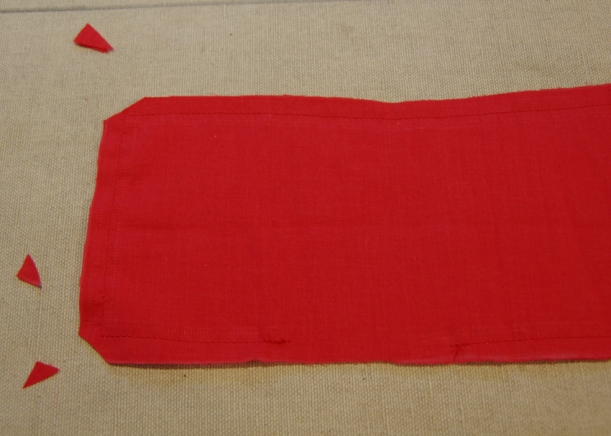
If you are sewing the optional cash insert, now is the time to stitch the two layers with right sides together.  Leave an opening at the bottom so that you can flip it right side out.  Before flipping, trim any bulky seam allowances and clip across the corners:

Wallet Sewing Pattern Tutorial-60

Press the insert crisply.  Open your wallet flat and place the insert on top of the wallet between fold lines 1 and 2.  Notice that the insert does not quite extend from fold line 1 to 2 (it’s a bit narrower).Wallet Sewing Pattern Tutorial-61

Refold the wallet and pin the insert in place so that the left and right sides sit exactly at fold lines 1 and 2.

Wallet Sewing Pattern Tutorial-68

This will mean that the main wallet buckles slightly at the spine – this encourages the wallet to close flat as well.

Wallet Sewing Pattern Tutorial-62

Edgestitch around the sides of the wallet and along the bottom.  Leave the spine free of edgestitching.  It is important to keep all the fabric layers even so that you don’t miss the card slots or cash insert while edgestitching.  I like to stitch from the outside of the wallet to make sure that my stitching looks attractive and straight on this side (after all, this is where the stitching will be most visible).

Wallet Sewing Pattern Tutorial-63

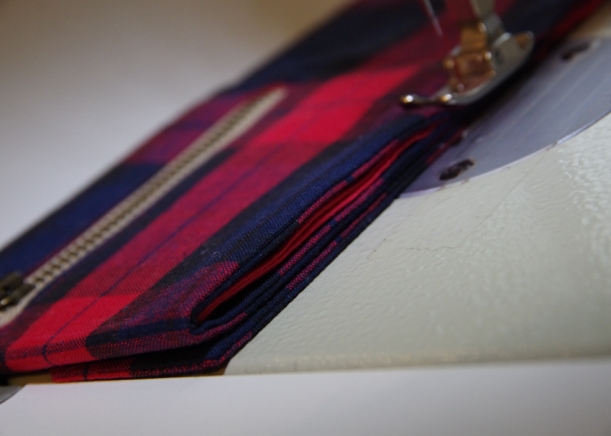
In the two photos below you can see where I edgestitched – in the first photo edgestitching is visible on the left hand side (this closes the left hand side of the coin pocket) and along the bottom.  The stitching stops before it reaches the gap at the spine.

Wallet Sewing Pattern Tutorial-66

From the inside of the wallet you can see the stitching along the right hand side (where it keeps the cash insert in place) and along the bottom.  The stitching stops prior to center where the card slots end.

Wallet Sewing Pattern Tutorial-67

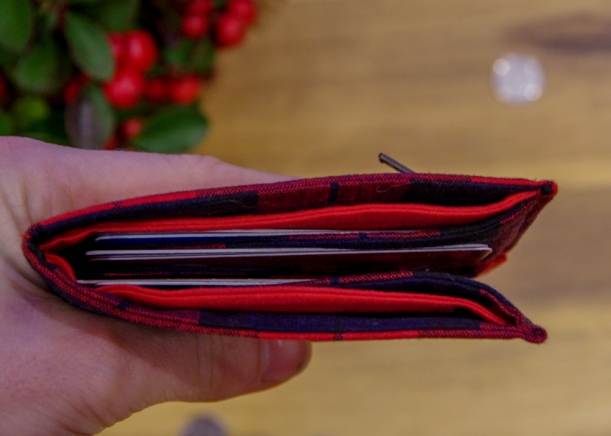
And that’s all there is to it!  Fill up the wallet with your cards or perhaps fill it with gift cards, notes and photos if you are giving it as a gift.  In the photos below I’ve filled it up with everything I carry in my wallet on a daily basis – this includes 8 cards, approx. 5 or 6 coins and a bit of cash.

Wallet Sewing Pattern Tutorial-47-2

Wallet Sewing Pattern Tutorial-51-2

Wallet Sewing Pattern Tutorial-50-2

Wallet Sewing Pattern Tutorial-48-2

Please don’t hesitate to comment if you have questions about the sewing process!  I would love to help!

Wallet Sewing Pattern Tutorial-44-2

Have fun sewing such a quick and practical project!

Get the Bifold Wallet here.

Get the Wallet Gift Giving Set (includes 3 projects) here.


4 Comments

How to stop a waistband from rolling over or buckling.

Have you ever had a problem with trousers that buckle, crumple or roll over at the waistband?  Even though they seem to fit nicely at your waist or hips and are comfortable, by the end of a day of wear the perfectly pressed waistband is a squished mess.

This ‘roll-over’ can be caused by the difficult to fit proportions of a rounded tummy but this isn’t always the case – some people find it is amplified by the size of their belt loops or the width of their belt.  They notice that some pants buckle all of the time and other pairs do not.  They find that pants that fit higher on their waist are less likely to buckle than low rise options (or vice versa).  It can be a tricky problem to deal with!

Thread Theory Menswear Notions (18)

One easy solution I have found is the use of Ban Rol instead of a regular fusible interfacing.  Ban Rol is a stiff polyester trim that you can insert between the waistband and waistband facing during the construction of the trousers or skirt.  It’s really easy to use and creates a gorgeous stiff waistband!  Aside from preventing waistband crumpling, it also keeps the corners of your waistband at a perfect right angle.

Thread Theory Menswear Notions (19)

I’ve carried Ban Rol in our shop for quite some time now (for $1.20 CAD per metre) but I haven’t really explained its use on the blog or created a tutorial!  I’m in the midst of making all new samples for our Thread Theory patterns and so thought I would take the opportunity to photograph how I insert Ban Rol into the waistband of the Jedediah Pants.  It’s really easy!

My method does not involve stitching the stabiliser to the waistband at all – it is simply floating freely within the waistband casing.  This is a quick method that I find works just as nicely as other methods I have seen…as long as your Ban Rol matches the finished width of your waistband.  You can trim Ban Rol so that it is narrower to match a thin waistband but I wouldn’t recommend using Ban Rol that is too narrow for an extra wide waistband.  We carry the correct size for the Jedediah Pants or Jutland Pants patterns (1 1/2″ wide).  It is also a pretty standard size for most trouser and jean waistbands.

Ho to use Ban Rol-1

Cut the Ban Rol to approximately the length of the waistband.  I just cut it the length of the pattern piece and trimmed off the seam allowances later.

Sew your waistband as per normal.  Various pattern instructions will include different waistband construction techniques.  Regardless of the technique used, stop construction when there is still an opening into which you can insert the Ban Rol.  In the case of the Jedediah Pants, this is after you have sewn the waistband to the pants and created the corners (Belt Loops & Waistband Step 9).

Ho to use Ban Rol-2

Gently push the Ban Rol behind the seam allowance and, if necessary, use a point turner or tweezers to push it right into one finished corner of the waistband.

Ho to use Ban Rol-3

Here, looking at the wrong side of the pants, you can see that the Ban Rol is tucked underneath the seam allowances:

Ho to use Ban Rol-8

Before pushing it into the other end of the waistband, place a pin through the first corner so that you do not pull the Ban Roll out of place.  Also, make sure that the Ban Rol is the perfect length.  If it is too long, just trim the Ban Rol slightly.

Ho to use Ban Rol-6

Now close up the waistband as per the pattern instructions so that your Banrol is encased but still sitting freely within the waistband (you don’t need to stitch through it at all).

Here’s how your waistband will look from the right side (sans a jeans button):

Ho to use Ban Rol-10

And from the wrong side (I love my buffalo check binding!):

Ho to use Ban Rol-12

Enjoy washing and wearing your perfectly crisp waistband…crumple and roll-free!


11 Comments

Lazo Hack: Elastic Waist Joggers

lazo-trousers-elastic-waistband-36

As promised, here is my contribution to the ongoing Lazo Hack contest.  I’ve made a few simple adjustments to the Lazo Trousers pattern to produce elastic waist joggers with a satin ribbon drawstring!

lazo-trousers-elastic-waistband-52

While working on these joggers last night I snapped a few pictures to create a tutorial for you.  I’ll show you how to adjust the front waistband so that it is one piece, switch the fly from functioning to a mock fly, and add elastic and buttonholes for a drawstring.  You can hem the trousers as per normal or you can add some narrow cuffs at the ankle as I did.

anthropologie-joggers

(Velvet jogger inspiration from Anthropologie.  I love the tassel drawstring!)

Transforming the Lazos into joggers is a VERY simple hack that could work for both woven and knit fabrics.  Any woven fabric that you might choose for a regular pair of Lazos will work for these joggers (chambray tencel or velvet would be awesome!).  If you want some jogger inspiration, here is a good series of styled images.  I’m probably a bit late to the jogger trend (I think it began in 2014) but I’ve never really adhered to trends anyways, I just choose my clothing based on my current lifestyle and mood.


Ok, let’s convert the Lazos to joggers:

Begin by selecting and altering your pattern pieces.  The only pattern piece you do not need to use is the Zipper Shield.

The only pattern piece you need to change is the Waistband Front – simply fold under the extension at the notches and cut the waistband on the fold (just like you cut the back waistband).  There is no need to cut interfacing pieces for the waistband or fly.

lazo-trousers-elastic-waistband-1-2lazo-trousers-elastic-waistband-2-2

Assemble the trousers as per the instructions all the way up to the Fly Front section.  If you are working with a knit, you might like to use a stretch stitch or a serger so that your seams are not at risk of snapping when the fabric stretches.

lazo-trousers-elastic-waistband-2

To create the mock fly finish the seat seam as instructed.  Next, sew the inseam, but instead of stopping just below the zipper placement notch, ignore the curved fly facing and stitch in a straight line all the way up to the fly facing notch (which is the centre front of the pants).  If you prefer to leave off the fly altogether (perhaps you would like to insert a side seam invisible zipper instead), you can trim off the fly facings.  To sew the mock fly, press the facings towards the right side of the trousers (if you were wearing them).

lazo-trousers-elastic-waistband-3

On the right side of the trousers, topstitch as you would normally to give the illusion of a functioning fly.

lazo-trousers-elastic-waistband-1

Now we are ready to assemble the waistband!  If you would like to add a drawstring later, now is the time to add buttonholes to your waistband front.  Apply a small square of interfacing to the centre of the waistband on the wrong side of the fabric.  This will help to stabilise the fabric when you sew your buttonholes and it will make your buttonholes less likely to become misshapen with use.

lazo-trousers-elastic-waistband-7

To position your buttonholes, fold the waistband front in half and measure in from the fold 1/2″.  Place a pin through both layers of fabric and then mark the pin’s position with chalk (preferably on the wrong side of the fabric so that you don’t have to wash out your chalk as I did!  Sorry for the wet waistband later on in the post…I was on a roll while I was sewing and didn’t want to stop to wait for the fabric to dry!).

lazo-trousers-elastic-waistband-8

I chose to add 1/2″ buttonholes but you can add whatever size you prefer based on the drawstring that you choose.

lazo-trousers-elastic-waistband-10

Now place the waistband front and back with right sides together and sew the side seams.  Repeat this step for the waistband facings (the second set of waistband pieces).

lazo-trousers-elastic-waistband-11

You now have two waistband loops.  Place these with right sides together and sew along the entire top edge.  By the way, at this point it would be easy to make your waistband shorter by simply chopping off the top of the waistband before you sew the two loops together.  You could choose to match the width of elastic you plan to use for instance.  I left my waistband the full height because I wanted them to be high rise trousers.  Centring the 2″ elastic within the waistband resulted in a bit of a paper-bag silhouette.  If your waistband does not extend above the elastic your trousers will not have a ruffled top edge as mine do.

lazo-trousers-elastic-waistband-13

You might like to understitch along the top of the waistband to prevent the facing from rolling outwards.

lazo-trousers-elastic-waistband-16

Attach the waistband to the trousers while keeping the waistband facing free.  Place the waistband and trousers with right sides together.  Make sure to centre your buttonholes over the seat seam and align your side seams.

lazo-trousers-elastic-waistband-17

Press the seam allowances towards the waistband and then press the waistband facing downwards to enclose all of the raw edges.  You can either finish the waistband facing edge at this point or you can press under the seam allowance for a very tidy look.  I left my serged edge visible because my fabric is pretty bulky so I didn’t want to add another layer of fabric.

lazo-trousers-elastic-waistband-18

Pin the waistband facing in place carefully.  I would highly recommend basting it in place so that you don’t have to worry about it shifting during the next step!

lazo-trousers-elastic-waistband-20

From the right side of the trousers, start 1″ away from one of the side seams and stitch in the ditch all the way around the waistband.  Finish your stitching 1″ away from the same side seam so that you are left with a 2″ opening at the bottom of the waistband facing.  You will use this opening to insert the elastic.

Circle elastic around your waist to find the perfect fit.  I circled mine at my natural waist but if you have shortened your waistband to fit your elastic width, circle your elastic a couple of inches below your natural waist since the trousers will now sit lower.  Remember to include some extra elastic so that you can overlap the ends later to create a loop!

lazo-trousers-elastic-waistband-21

Thread the elastic into the opening using a safety pin.  Once both ends are pulled out of the opening check that the elastic is not twisted within the waistband and then overlap the ends and stitch them together.

lazo-trousers-elastic-waistband-22

Close the elastic within the waistband by stitching in the ditch over the 2″ hole.

Try on your Lazos to check the length of the hem (and to admire how they look!).  Hem them in the style that you choose (a regular hem, a wide cuff or a narrow ribbed cuff like mine).

lazo-trousers-elastic-waistband-37

Now you have several options to prevent your elastic from shifting around in the waistband.  The simplest option is to distribute the fabric nicely around the elastic (while you are wearing the trousers) and then place a pin through the side seams and elastic.  Stitch in the ditch of the side seam to secure the elastic in place.

To create the paper bag waist and more thoroughly secure your elastic in place, you can toptstitch along both the top and bottom of the elastic around the entire waistband.

lazo-trousers-elastic-waistband-28

Now all you need to do is thread a drawstring through the buttonholes using the same safety pin technique is before and your joggers are complete!

lazo-trousers-elastic-waistband-25

I hope you like my fresh interpretation of the Lazos Trousers!  Have you tried hacking them yet or do you prefer to sew them as is?

Edit Jan 25th: Some of you asked me to model these Lazos for you – here I am in my jammies 😉  They look pretty cozy eh?

lazo-pjs


To finish off Friday in a happy sort of way, let’s do the third Lazo Hack contest draw!  Today’s winner is Meg (@madebymegblog)!  Check out the awesome way she styled her Lazos.

The rolled hems and boot combo is really wearable and cute!  Congrats Meg, your use of #lazotrousers has won you $25 to Blackbird Fabrics.  Thanks for sharing!

studio-tour-and-gift-boxes-30

I will draw the last Lazo Hack prize on Friday, Jan. 27th.  The winner will get to choose which goodies (from our shop) they would like me to fill this sewing caddy with – up to a $100 value!

You have 7 days to take a photo of your Lazos whether they are still a work in progress or finished and share them on Instagram or Facebook using #lazotrousers.

Download your Lazo pattern >


13 Comments

How to Create a Custom Fit Men’s Shirt

Today we are discussing how to fit our mock-ups of the Fairfield Button-up Shirt.

Before we delve into this, I have a quick announcement about the agenda: This post ended up becoming very long so I am posting the some of the fit adjustments today and the rest will be posted after the long weekend (Tuesday, May 24th).  I will catch up with the rest of the sew-along by posting both on Wednesday and Thursday.

Fairfield sew-along

Now, let’s talk about fitting!

Many months ago when I asked for your input while I was designing the Fairfield pattern, many of you gave me some insight into fitting issues you struggle with.  The main ones that you mentioned were:

  • A slim build (most patterns include too much fabric around the waist and in the sleeves for your figure)
  • A long body (most shirts are too short to tuck in comfortably)
  • An unusual neck size (thinner or thicker than most shirt patterns)
  • A rounded belly
  • Uncommon shoulder dimensions or shape (narrow, wide or rounded)

We will be addressing all of these today.  If you have a particular fitting puzzle that I haven’t gone over in the post below, please comment and I will try to help you out!


Let’s get started:

Choose a shirt size-3

Put the mock up on your wearer.  Pin the mock up closed at center front all the way up the the collar stand.  Make sure the pins are pointed away from the wearer’s chin…ouch!

Choose a shirt size-6

Stand back and carefully examine the wearer and mock-up while they stand in a relaxed but fairly upright posture.

Most fitting reference books suggest that you address fit issues in this order

  1. Length issues (from neck to hips and then sleeves)
  2. Width issues (from chest down to the hips) and lastly
  3. Specialized alterations (such as a rounded back or belly).

I have also been taught in various fitting classes to address fit issues from largest/most obvious to smallest (while very generally sticking to the top to bottom rule but bending it if necessary).

Both approaches have worked for me in the past.  I find I change tactics depending on the garment type and the specific fit issues involved.  For example, I will use the first approach if there are very few unusual fit issues involved.  As another example, if a rounded back fit problem is quite severe, I will use the second approach because often adjusting for the rounded back will allow the strained fabric to relax and solve any length issues.

In an attempt to make this post very visual, I’ve pretended that Matt has a few of the following fit issues by pinning the shirt to make it smaller, larger, shorter or longer than it actually is.  I hope these photos help!

First we will look at the fit issue as it appears on Matt.  I like to ‘solve’ the fit issue on the muslin by cutting or pinning to visually get a grasp on how the change will look on the paper pattern.  Then it is just a matter of making the same cuts and adjustments to the paper pattern pieces.

How to fit a button up shirt (20)

When I cut the mock up apart I like to use medical tape or masking tape to hold the various pieces together.  This allows me to measure the open areas once I take the mock up off of Matt so that I can use these exact measurements when changing the paper pattern.

After each fitting explanation I’ve included resources.  These resources are blog posts that focus on one fit issue exclusively.  They go into greater detail then I have here since I am covering many fit issues at once.  Aren’t we lucky to have the internet filled with such amazing, instantly accessible resources?!

Before working with your paper pattern, make sure to draw in all seam lines!  Changes will be made from the seamline and not from the edge of the paper.

Length:


Torso

How to fit a button up shirt (1)

The hem should not become untucked when the arms are raised.  The hem shouldn’t extend beyond the bottom of the pant fly.

How to fit a button up shirt (2)

Solution:  Add or remove length to the shirt fronts, back and the placket interfacing.  Cut along the “Lengthen or Shorten Here” lines.  Overlap the pattern pieces to shorten and tape the pattern pieces to a new sheet of paper to lengthen.

Resources: Check out my tutorial on lengthening and shortening a pattern for all of the details!


Shoulder

How to fit a button up shirt (3)

The shoulder seam should meet the armhole at the end of the shoulder bone (before the shoulder begins to curve towards the arm). It is too long if it extends onto the arm.  It is too short if it causes the sleeve to pull and sits before the end of the shoulder bone.  I’ve pinned the shoulder seam so that it appears too short for Matt in the photo below:

How to fit a button up shirt (4)

Solution: You will need to adjust the shirt front, yoke, and shirt back.

Adjust the Shirt Front:  On the shirt front, cut into the pattern from the middle of the shoulder seam to the armhole seamline (3/8″ from the edge of the paper).  Cut into your armhole seam allowance slightly and leave a “hinge” of paper between the two cuts.

Here is how it looks on the mock-up:

How to fit a button up shirt (5)

And here is how it looks on the pattern:

Shoulder-length---front

  • To create a longer shoulder seam, spread the large cut open and allow the small seam allowance cut to overlap.  Tape the pattern piece to a sheet of paper to fill in the empty wedge and trim.
  • To create a shorter shoulder seam, overlap the large cut and allow the small seam allowance cut to spread open.  Tape the overlapped cut closed, straighten out the shoulder seam by drawing a new line with a pencil and trimming along this line.  Fill in the empty wedge in the armhole seam allowance by taping the pattern to a piece of paper and trimming.

Adjust the Yoke/Shirt Back: You have two choices here.

Shoulder-length---yoke

  1. Cut through the yoke pattern piece and spread it wider or overlap it (just like lengthening or shortening a pattern…but this time the cut is vertical rather than horizontal).  This adjustment is easy but it means you will also need to add or remove width to the shirt back which will change how the shirt body fits.  If you notice the muslin is too baggy or too tight, slashing along the entire shirt back will solve two fit problems at once.
  2. If you are happy with the fit of the shirt body and only want to adjust the shoulder length slash towards the armhole in the same manner as we did for the Shirt Front.  Here is how this looks on the mock-up:

How to fit a button up shirt (7)

And here is how this looks on the pattern:

Shoulder-length---yoke-2

Resources:

Note that both these tutorials use a second cut and hinge to raise the shoulder seam upwards.  This cut may seam a little fancy or confusing (which is why I don’t use it in the method above) but it will make it easier to draw a new shoulder seam because both halves of the cut shoulder seam will still match up fairly well.

Colette Patterns Albion Sew-Along: Adjusting shoulder length with a yoke

Curvy Sewing Collective: Narrow Shoulder Adjustment

Sleeve

How to fit a button up shirt (2)

The bottom of the cuff should sit where the palm meets the wrist (about 1″ below the protruding wrist bone).  Keep in mind that adjusting the fit of the shoulder can change the sleeve length so it is a good idea to fix any shoulder fit problems before finalizing the sleeve length.

Solution: Add or remove length to the shirt sleeve.  Cut along the “Lengthen or Shroten Here” line and adjust as mentioned for the torso.

Resources: Check out my tutorial on lengthening and shortening a pattern for all of the details!

Width:


Back and Chest

As I mention in the instruction booklet, choose your pattern size primarily based on the Chest circumference.  If you try the mock-up on only to find there is not enough arm movement due to strain across the back or that the fabric is pulling across the chest, the simplest solution is to pick larger pattern size.  You can then adjust the more detailed areas of the pattern (the neck size, the shoulder length, the hip width, the sleeve length) to suit the wearer.

Sleeve

We have drafted the Fairfield Sleeve to be fairly slim.  If you notice that the sleeve is too restricting when rolled up to the elbow, you might like to add width to the sleeve.  In the photo below I’ve pinned the sleeve along the seam so that it is about 1.5″ narrower than the actual Fairfield sleeve to show you how a sleeve width fit issue would appear:

How to fit a button up shirt (8)


Solution: Add up to an inch of ease by cutting horizontally across your sleeve pattern at the underarm and cutting vertically the entire length of the sleeve.  Leave a “hinge” at all four seam lines.  Clip into your seam allowances to make it possible to spread the sleeve open.  Spread the vertical cut line open the amount necessary to create some room in the sleeve.  This will cause the horizontal cut line to overlap which will shorten the sleeve cap very slightly.  Add the height back to the sleeve cap by drawing a slightly taller cap.

Here is how the vertical cut appears on the actual mock up:

How to fit a button up shirt (10)

And here are the cutting lines you would need to make on the pattern to add this extra width:

Add-room-in-sleeve

Resources:

I haven’t photographed/illustrated this adjustment thoroughly because the Curvy Sewing Collective has done a bang up job of doing so!  Their tutorials are awesome 🙂

Waist and Hips

The Fairfield waist curves inwards slightly to suit an ‘athletic’ or slim figure.  I have pinned the mock-up at center back in the photo below so that the shirt appears tight at the hips for Matt – this way you can see what the mock-up would look like if you needed to add width:

How to fit a button up shirt (12)

If the wearer has a fuller figure you have three choices:

Side-seam-adjustment

  1. Adjust the side seam shape so that it is straight or less curved.  This small adjustment will give the wearer a little bit more room but won’t solve any serious fit problems.
  2. Grade up to the next size at the waist and hips.  This is a great choice for figures who do not have a rounded stomach but who are stocky instead of lanky.  Their mass is distributed fairly evenly around their torso.
  3. Use our “Larger Figures” pattern. It is tricky to adjust a pattern to suit men with larger figures because men tend to carry the extra weight distributed mostly towards centre front.  This means it is necessary to angle the centre front in addition to adjusting the side seam shaping.  A button up shirt includes lots of detail at centre front so we made this adjustment for you!

Resources:

Check out our tutorial on grading between sizes – it is very easy!


Now that we have some of the basics figured out, we will move on to special fit issues on Tuesday.  These include, adjusting the neck size, adjusting for sloped or square shoulders, and adjusting for a rounded upper back.


Leave a comment

How to use PDF Patterns – updated tutorial

How to use a PDF pattern (3 of 13)

We have received several emails lately from people who are excited to get sewing but are unsure of how to best assemble their PDF patterns.  I usually refer people to our How to Assemble a PDF Pattern tutorial but have been increasingly inclined to send people to tutorials found elsewhere on the internet because our tutorial has been looking quite dated and a bit inaccurate of late!  Matt and I made the tutorial very quickly three years ago one sunny Spring morning while we were simultaneously packing for a camping trip with my sister.  She was waiting in the car for us to join her while we frantically uploaded the photos to the blog so that we could check the tutorial off of our to-do list before the weekend adventure.

After three years and many improvements to the design and function of our PDF patterns, it is time to give this tutorial the attention it deserves so that it can serve its purpose as a clear guide for anyone who is new to working with our digital patterns!


Download and Open the Pattern

When you purchase a Thread Theory PDF sewing pattern, a download link will appear on your computer screen.  The same download link will also be sent to the email address that you entered during the checkout process.  Click either of these download links to save the pattern folder to your computer.

Download-PDF-pattern-tutorial

The pattern folder will likely be saved to your Downloads file.  Find it straight away (before you forget where it has been saved!) and move it to a location on your computer where you will be able to find it in the future – perhaps in your Documents folder.

The pattern folder is a zipped folder – this means that multiple files have been compressed into one tidy folder so that they take up less space.  To unzip the folder with a Windows computer, right click and select Extract All.  To unzip the folder with a Mac, option click and select Extract All.  To access the files from an ipad, you will need the iZip app to unzip the folder.

Examine the Files

Within each PDF pattern folder you will find several PDF files.  To view and print these files you will need a PDF reader installed on your computer.  Many computers will have this reader already but if you do not, you can download the free Adobe Acrobat Reader software here.

  1. Read Me First – Read this first!  This is a small introduction on how to assemble the Print at Home pattern.  You don’t need to print this but it is important to read it and refer to the page layout chart when you are taping together your pattern.
  2. Instructions – You can either print these off or you can keep them on your laptop or tablet to refer to while you are sewing.
  3. Print at Home (depending on the pattern, there may be one or several of these) – The rest of this tutorial will explain how to print and work with the Print at Home pattern.
  4. Print Shop – Roll Feed – If you prefer to avoid taping or don’t own a printer, give this file to your local print shop.  Specify that the file must be printed without scaling – the pattern pieces need to be full sized.  The Roll Feed file is designed to work with 36″ wide wide format printers.  These are commonly found throughout North America.
  5. Print Shop – A0 – This file can be sent to print shops that print on A0 size paper.  Depending on the pattern you are using, you will likely need to tape one or two sheets together (for instance, a trouser leg is longer than one sheet of A0 paper and so it will be spread over two pages).  A0 printers are common in Europe and Australia.  As with the Roll Feed print option, make sure to specify that you would like the file printed full size (without scaling).


Print at Home

Let’s talk more about using the Print at Home file.  This option is very convenient – you can purchase a pattern and get started with the sewing process immediately!  There is no need to wait for the pattern to ship to you or for the print shop to print your file.  The entire process is in your control.

While Print at Home PDF patterns offer advantages, there are also disadvantages to (depending on your perspective).  Our Print at Home files are designed to print on Letter or A4 sized paper.  This means that you will need to tape or glue together many small sheets of paper to prepare your pattern.  This is a time consuming process.  Some people dislike doing this and others (myself included) find this to be relaxing and even meditative.  I like to spend the assembly time contemplating my fabric and design choices.  Assembling the pattern allows me to familiarize myself with the pattern pieces – it has become part of my creative sewing process!

Read Me First

To print the pages, open up your Read Me First document.  This page of instruction will tell you what page you will find the 3″ test square.

PDF-Tutorial-How-to-Print

Open up the Print at Home file.  Select File > Print and your printer dialogue box will open.  Every dialogue box is slightly different (based on your printer’s software) but it will include the same basic options:

  • Printer Scaling: Ensure that ‘scaling’ is off so that your pattern pieces print at their full size.  Printers tend to default to scaling so that the text or images fit nicely on a page of paper – we don’t want this when printing a sewing pattern!  To turn off scaling you will likely need to deselect “Fit to Page” or “Scale to Fit” (depending on your printer software).  Ensure that Scaling is at 100%.
  • Single Sided: Also, if your printer has the ability to print double sided pages, make sure that your printer is set to “Single Side” printing…don’t print double sided!  You will likely find this option in Properties.
  • Econo Mode: If you would like to save ink/toner and paper, you can often find an “EconoMode” or “Draft Quality” printer setting that allows you to print with less ink. You will likely find this option under Properties > Paper/Quality.  You can also replace the regular paper in your printer with recycled paper.  I like to save up any paper that I have used (but only printed on one side) rather than throwing it in the recycling bin.  That way I can print my PDF pattern on the unused side of the paper!

Print the page with the test square first by selecting the page mentioned in the Read Me First document.  Measure the test square with a ruler.  It should measure exactly 3″.  If it does not, your printer still has scaling turned on.  Don’t print the rest of the pattern until the square measures 3″.

How to use a PDF pattern (1 of 13)

Print the rest of the pattern by printing all pages.  If you like, you can number each page in the blank margin so that the pages are easy to keep in order even if they get knocked to the ground by a mischievous cat (speaking from experience…).

Assemble the Print At Home Pages

The pages are like tiles that need to be assembled into a single rectangle before you cut out your pattern pieces.  Often times, people that are new to working with PDF patterns try to assemble each pattern piece individually.  It is actually less time consuming and more accurate to tile all of the pages so that you are left with one large page – after which you can cut out your pattern pieces.

How to use a PDF pattern (4 of 13)

Begin by trimming the right and bottom margins off of each page.  We include scissor markings on every margin that needs to be trimmed.  Trim on the outside of the black border.

How to use a PDF pattern (6 of 13)

Assemble the pages one row at a time.  It is most accurate to assemble each row and then join the rows together.  It is a common mistake to try to assemble a PDF pattern one page at a time left to right, top to bottom – this can lead to frustration because any inaccuracies in taping will grow larger by the time you get to the bottom right corner.  Assembling in rows is much easier and it doesn’t take up so much space on your table or floor!

How to use a PDF pattern (8 of 13)

You can use glue or tape (or both) to attach each page together.  Place the pages so that the remaining margin overlaps underneath the next page.  The two triangles featuring a number and letter will match together to create a diamond.  Spread glue along the entire margin or place a piece of tape or two on each pattern piece.

How to use a PDF pattern (7 of 13)

Once all of your rows are assembled, you can tape or glue them together to create one large rectangle.  If you are lacking in floor or table space you can tape together two or three rows and then cut out any whole pattern pieces roughly.

How to use a PDF pattern (9 of 13)

How to use a PDF pattern (10 of 13)

How to use a PDF pattern (11 of 13)

Continue to tape two or three rows at a time until all pattern pieces are cut out.  You will be left with a manageable pile of pattern pieces to trim carefully.  I use this method on my dining room table and my outdoor picnic table – it’s very handy because it means I don’t have to crawl around on my hands and knees around a big rectangle of paper on the floor!

How to use a PDF pattern (12 of 13)

Use and Store the Pattern

You can also leave the entire rectangle assembled and trace out the pattern in the size that you need.  This way you can roll up the rectangle and store it as a complete ‘master’ pattern so it is ready to use when you want to sew a different size or variation of the same pattern.  Alternatively, you can just print out and assemble the pattern any time you need a new copy – that is one of the best aspects of using a PDF pattern!

There are many ways that you can store your printed PDF patterns – you can roll them up with an elastic or ribbon or you can fold them up and put them in an envelope or in a plastic insert within a binder.

If you fold your pattern pieces, flatten them out before using them again by putting an iron on low heat with no steam.  Use a pressing cloth underneath and on top of the pattern piece (so that you don’t melt the tape or transfer the printer ink to your ironing board or iron) and press gently.

This is how I store my PDFs – I love being able to rifle through my pattern selection!

How to use a PDF pattern (13 of 13)


If you have any unanswered questions about working with PDF patterns, please have a look at our FAQ page or email me (Morgan) at info@threadtheory.ca.  I would be happy to help you out!


20 Comments

Silk Tie Sewing Tutorial

Father's Day Tie - Thread Theory - 1

Would you like to try your hand at tie-making this Father’s Day?  It isn’t difficult to make your Dad a tie since the internet abounds with beautiful tutorials and even free patterns for all skill levels!  Since a quick search for “tie tutorials” can lead to fairly overwhelming results, I decided to compile the fruits of my research into one handy blog post and a tutorial that brings together all of my favorite elements from the instructions already available on the web!  Britex has a wealth of tie making supplies that can be very difficult to find elsewhere.  For my tie I used this sunshine yellow Italian silk faille featuring nothing less than hot pink embroidered crabs!  Since ties are cut on the bias, this silk was ideal for my purposes – the crabs run 45 degrees to the selvage!  The silk is from Britex Fabrics and is currently sold out – there are all sorts of other gorgeous silks in their online shop though!

Father's Day Tie - Thread Theory - 2

I consulted Matt (the prospective wearer) on the direction of the crabs – he elected to point them downwards so they wouldn’t be aggressively pinching at his neck.Father's Day Tie - Thread Theory - 3

While you will find my tutorial below, first (or afterwards) you might like to read all of the tutorials and other resources that I found so that you can truly immerse yourself in the world of tie-making.  Here are all ofthe links sorted into the various categories that I researched:

The Anatomy of a Tie:

Tutorials geared towards the average home sewer:

Tutorials geared towards the advanced home sewer/menswear enthusiast:

Videos on Tie-making:

Particular Tie-Making Techniques:

Pattern Options:

Father's Day Tie - Thread Theory - 6

Now that we’re prepped, let’s move on to my tutorial!  For this project you will need:

  • 1 yard silk of medium weight.  This may seem like a lot of fabric but remember that your tie must be cut on the bias!  You may be able to squeeze a tie out of less if you are careful.
  • 1 yard interlining (described below).  This will also be cut on the bias.

Most ties are created with a sewn in (rather than fusible) interlining comprised of wool or a wool/nylon blend.  This interlining gives the tie body (a good tie shouldn’t be flat, it should be lightly pressed so it maintains a three dimensional quality) and also a bit of rigidity.  It is important to match the interlining with the fabric otherwise you run the risk of making your tie too stiff and negating the point of cutting your tie on the bias!  You want your tie to look fluid and smooth…achieving this is probably the trickiest aspect of tie-making.
Father's Day Tie - Thread Theory - 8

Since this silk faille was quite stiff I decided to use a loose wool interlining.  In retrospect, I wish I had chosen an option with a touch more rigidity such as this classic wool interlining.  Aside from the lack of rigidity, the color black was not the best pairing with the yellow silk – it shows through ever so slightly on the finished tie.  All the same, the amount of body this wool gives the tie is ideal and I am happy that the tie ended up fluid enough to allow it to hang nicely (though I worry it might become misshapen over time).Father's Day Tie - Thread Theory - 9

Since there is quite a bit of hand sewing involved in tie-making, it’s a good idea to use fine silk thread to avoid knots.

Once you’ve gathered your materials, establish the exact bias on both your silk and interlining.  Some tie patterns represent the entire tie so they must be cut on one layer of fabric while other tie patterns require that you cut them out on the fold (making it easy to fold your fabric on a 45 degree angle).

Father's Day Tie - Thread Theory - 10

A tie shell is comprised of three main pieces (pictured below from left to right): The blade (the wide front), the neck (the middle), and the tail (the narrower back).  The interlining is usually cut from one piece but I joined two pieces of fabric for mine by abutting the seams and zig-zagging them together so as to avoid adding extra bulk.  On the right hand side of the photo below you can see my two “tipping” pieces – the tie I have made is “self-tipped” rather than “decorative-tipped” because I used the same silk rather than a contrast material as the lining.  I also added a garment tag and a little strip of fabric to create a keeper loop.  A man can choose to feed his tie tail through it if he desires (though some fashion blogs say this is not currently fashionable…who knew?!).Father's Day Tie - Thread Theory - 11

I chose to start making my tie by sewing the tips.  Some people like to join the three main tie segments together before embarking on the tip but I wanted to avoid handling the tie as a long strip too much since the weight of the tips could cause the bias cut fabric to stretch out of shape.  Here is an example (of a store bought tie) so you can see what we are aiming for when sewing a tie tip:
Father's Day Tie - Thread Theory - 13

It is not easy to achieve something this precise (as you will soon see!).  While all the sewing involved in tie-making is basic, the precision and skill employed is key to a high-end tie.  I think I have a long ways to go before I could consider calling my version a ‘luxury’ tie!

If your tie pattern came with two pattern pieces for the tips, they will likely be the same size as the blade and tail tips.  Trim them down 1/4″ on all four sides (not along the top).

Father's Day Tie - Thread Theory - 14

Starting at the top edge, sew the tie and tie tip together with right sides together and a 1/4″ seam allowance (you can see my stitching on the right hand side of the photo below).  Stop sewing 1/4″ from the end of the tie tip.Father's Day Tie - Thread Theory - 15

Here is a detailed photo showing you where to stop sewing:Father's Day Tie - Thread Theory - 16

Pull the tie tip over to the other side of the tie so raw edges meet and sew the other side of the tie tip in the same manner.  You should sew up to but not over the previous stitching to form a precise point.  Be careful to push the excess tie blade fabric out of the way (it will form a bubble).
Father's Day Tie - Thread Theory - 17Here is a close up of the tie tip with the bubbled tie blade below:
Father's Day Tie - Thread Theory - 18

And here is a photo of the bubble from the wrong side of the tie blade:Father's Day Tie - Thread Theory - 19

And a close up of this bubble:Father's Day Tie - Thread Theory - 20

Finish the tie point by folding the blade in half and stitching across the point from the center of the blade to the raw edge.  This stitching will be perpendicular to your stitched point and within the seam allowance  it should not cross your previous stitching.Father's Day Tie - Thread Theory - 21

When you turn the tip right side out, try pinching the point seam allowance to stop it from crunching up and becoming misshapen as you fold.  The goal is to have your point seam allowance fold neatly within the tie.  I wouldn’t advise trimming the point when you are working with silks since the danger of fraying drastically is very great!Father's Day Tie - Thread Theory - 22

My point did not turn out perfectly but stitch ripping was only an option once due to the amount of fraying I was experiencing!  The point is not 100% angular but it is certainly passable from the distance most will be viewing it.  From the underside you can see why it did not end up appearing precise:Father's Day Tie - Thread Theory - 23

Practice will hopefully make perfect!


Now it is time to sew the three tie segments together.  Carefully press open the seam allowances (don’t push the iron along the fabric as this will cause your bias cut fabric to stretch out of shape, instead, just lift the iron up and move it to the next position).Father's Day Tie - Thread Theory - 24

Now that the points are assembled and the tie segments are joined, it is time to insert the interlining and prepare to hand stitch the final seam!Father's Day Tie - Thread Theory - 25

Turn under the seam allowances 1/4″ along the entire length of the tie (again, make sure to press instead of iron!).Father's Day Tie - Thread Theory - 26

Press the tie edges inwards to meet in the middle.  As you can see in the store-bought tie below, sometimes this seam can be slightly overlapped – depending on how you like to slip stitch, you can either abut the seam or overlap!  You can also see how the keeper loop is inserted into this seam prior to stitching it down.  We will do this now:Father's Day Tie - Thread Theory - 27

Create your keeper loop using a scrap of the silk.  Ideally you would create a tube and turn it right side out.  You could also avoid the frustration by simply creating binding and top stitching the open edge closed (keep in mind this makes the keeper loop a little stiff).


Stitch the loop to the seam allowance on the tie blade:Father's Day Tie - Thread Theory - 28

You can see the positioning of the keeper loop below:Father's Day Tie - Thread Theory - 29

Pin the entire seam together and prepare your thread for hand stitching!  It is a good idea to run your thread through beeswax because you will likely be working with a very long piece of thread if you are trying to stitch the entire seam in one go.  While it is possible to stitch the seam using several shorter lengths of thread, this is not ideal due to the nature of the slip stitch you are about to sew.  Adding too many anchored points will cause the thread to restrict the natural fluidity of the tie (you will see what I mean in a moment!).Father's Day Tie - Thread Theory - 30

Begin stitching by anchoring the thread at one end of the tie:Father's Day Tie - Thread Theory - 31

Create a large and loose slip stitch all the way along the seam (I allowed the thread to travel up the silk 1/2″ between each stitch).  See the list of tutorials above to learn how to slip stitch.  Be very careful when stitching to avoid stitching into the front of the tie!Father's Day Tie - Thread Theory - 32

To end your stitching you will be creating another anchor/tack – but this time, the first loop of the anchor will not be pulled tight.  Leave a loop of thread (as pictured below but about half the size) that you can tuck into the tie.  This loop will allow your slip stitch to adjust in tension as the tie is worn and rolled over time – it will seem strange to leave your hand stitching so loose and seemingly fragile, but it is very necessary when trying to achieve a fluid tie.Father's Day Tie - Thread Theory - 33

Now it is just the finishing touches left!  Press the keeper loop flat and tack each side to the back of the tie.Father's Day Tie - Thread Theory - 34

Bring your thread and needle down through the inside of the tie to stitch on the garment tag.  Make tiny stitches along either short edge of the tag.Father's Day Tie - Thread Theory - 35

Your tie is complete!  Give it a final gentle press and examine your work:Father's Day Tie - Thread Theory - 36 Father's Day Tie - Thread Theory - 37

Before giving it to the wearer, fold the tie in half and roll it gently – this will allow the bias cut fabric to settle smoothly so that it is not stretched in any off-kilter sort of way.  Your loose stitching and anchored loop of thread will have a chance to work while you do this!
Father's Day Tie - Thread Theory - 38

I hope this tutorial saves you a lot of time researching before you embark on tie-making!  Have you tried making a tie in the past?  What resource or tutorial did you find most helpful?  Did I miss any key resources during my research?


16 Comments

Tutorial: Easy ways to create a roomier trouser crotch

Let’s say you have just sewn up a muslin of the Jedediah Pants or Jutland Pants pattern (or any other trouser pattern) and notice strain lines radiating from the fly of the trouser when you try the muslin on.  The trousers seem to pull and bind between the legs and are generally tight feeling and restricting across the stomach and upper thighs.  Don’t worry, this fit issue can be overcome!  Here is how:

With the muslin still on the wearer, cut a horizontal line through the center front of the crotch.  The fabric will release the tension and you will be left with a smile shaped gap.  Measure the widest point on this gap – this is the total amount you will need to add to the crotch seam so that there will no longer be strain lines.

muslin

There are two common pattern alterations that you can try to add this measurement to the crotch seam.  The first common and quick fix to try is to simply lengthen the crotch depth by slashing across the pants front at the hip and adding the appropriate amount of length.  This simple pattern alteration maintains the shape of the crotch curve but just makes it a little longer.

lengthening crotch depth

If you try this pattern alteration and it does not seem to work for you (for instance, your new muslin now looks like you are wearing drop crotch pants!), this is likely because the fit problem isn’t about the crotch depth being to short for you.  Instead, the problem is that the crotch circumference is too narrow and the seat seam curve does not suit the shape of your body.  This may be because your abdomen is slightly more rounded than the fit model’s shape or it could be due to roundness in the crotch caused by specifically male body parts!  Either way, you will need to perform a slightly more complicated alteration to your pants front pattern piece.

Here is how to add crotch circumference: 

1. Mark all the seamlines on your pants front pattern piece.  The seam allowance included within the Jedediah Pants and Jutland Pants patterns in 5/8″.  When performing alterations to a pattern piece you need to work from the seamline (where you will actually be sewing) rather than from the edge of the pattern piece so that you will retain the original shape of the pattern.

Mark seamlines

2.  Draw a horizontal line across the hips of the pant front pattern piece.  Slash along that line from the fly front to just before the side seamline – don’t cut all the way through the seamline and seam allowance because you will need to leave a little bit of paper here to act as a hinge.  Now cut into the seam allowance without removing that tiny paper hinge.

3. Draw a line from the inseam seamline at knee level up to the crotch seam.  Try to end your line somewhere before the fly extension curve.  Cut from the crotch seam down to the inseam at knee level and again leave a little hinge of paper at the seamline.  Cut into the seam allowance on a diagonal without removing that tiny paper hinge.

Slash lines

4. Spread the two slashes slightly so that the crotch seam extends to the left and the waistline swings upwards.  You will notice that the little clips you made into the seam allowance will allow the seam allowance to overlap as you spread the pattern.  When measuring along the seamline (not the edge of the pattern piece), the total size of your two gaps should equal the measurement that you found when you cut across your first muslin.

Spread

5. Secure your spread pattern piece in place by taping the pattern to a couple new sheets of tissue paper.  Smooth the curve along the crotch seamline and smooth the seam allowance to match.


6. Depending on the pattern you are using, you will likely need to adjust a number of other small pattern pieces to suit the changes you made.  These will likely include the pocket pieces and facings and the fly shield.  The easiest way to make these changes is to line up the paper pattern pieces underneath the pants front pattern and trace the new angles onto the pocket.  Lengthen the fly shield to match the new length of the fly facing.

Other pattern pieces


*** If you are experiencing lines radiating from center back across the bottom and the pants seat seems generally too tight and flat for the rounded shape of your body, the same alteration can be applied to the pants back.  Slash and spread along several points at center back – try to pick points along the seat seam where the seam seems to least match your body.


9 Comments

Tips and Tricks: Sewing the Camas Blouse in Thicker Fabric

Meg (who’s blog is Made by Meg) has prepared her second guest blog post for us and it is filled with great tips!  If you are contemplating sewing the Camas Blouse in a thicker knit, this post will be a great chance for you to study up on useful techniques:
Meg Camas Blouse

Hello there, Meg here! We have gotten some questions since the release of the Camas Blouse about whether it can be sewn up in a thicker fabric. I’m a chronic rule-breaker, so my answer is, Of course! Thicker fabrics can be easier to sew, are warmer for those of you still stuck in winter, and give the blouse a whole new look. To demonstrate, I’ve sewn up my blouse in a medium-weight black ponte. Here is what I learned about sewing the Camas with thicker fabric.

Pleats

Pleats: The first thing I did was convert the gathering at the front and back to pleats. Gathering can look bunchy and bulky in thick fabric, so pleats hang much better on this blouse. For my version, I did two pleats on each side of the front and four in the center back.

Back

Yoke: If your fabric is particularly thick and stable, I would consider replacing the double layered yoke with a single layer. A more stable fabric is better able to support the weight of the garment, and reducing the yoke to a single layer will reduce bulk. This is especially true at the neckline, where you sew two layers of the neckband to the yoke, which could add up to four layers in total, plus seam allowances!

Neckband: To further reduce bulk along the neckband, I pressed the seams open instead of serging them together. This distributed the seam allowances on either side of the seam instead of to one side. To further eliminate excess fabric, you might also consider grading the seams so that one is shorter than the other.

Placket

Button Placket: I decided to create a faux opening for my shirt with buttons stitched closed through both layers. My knit was stable enough that I skipped the interfacing and simply sewed the buttons through the overlapping plackets to close the shirt. Because it’s a knit, it still slips on easily over my head without the need for functioning buttons. If you do plan on using real buttonholes, however, I would recommend a lightweight knit fusible interfacing to keep your buttonholes tidy.

Hem

Hems: While the pattern instructs you to turn the hems under twice and stitch down, on this version I only turned the hems under once. Knits do not ravel so the raw edges can be left unfinished, and only turning under the hem once reduced the bulk of the seam. To get a nice clean finish, I turned the hem up the recommended amount, stitched, and cut away the excess. Alternately, you could turn the hem under twice, press, and flatten the hem with a clapper or a wooden kitchen utensil to really press the seam.


Have you made one up in thicker fabric? Show us and tell us what tricks you used!


PIc ThumbnailHi I’m Meg! Making clothes is my creative outlet, and I started sewing and knitting in school when I realized I couldn’t wear a thesis or embellish my reports. Along the way, my sewing adventures have led me to knit scarves in the Peruvian Andes and refashion traditional dresses in Mexico City. I love to make things up as I go, mixing patterns and making changes on the fly. Professionally, I’m a researcher who loves presenting data visually in formats that are easy to understand. I hope you’ll follow along as I present inspiration and tutorials from Thread Theory patterns! You can also find me at megmadethis.blogspot.com.


Leave a comment

7 Ways to Customize Pants Pockets for Men

In case you do not know her already, I’d like to introduce you to a talented seamstress and one of the very first supportive sewists that Matt and I digitally ‘met’ when we started our big Thread Theory adventure: Meg of the blog Made by Meg!  Meg has been a test sewer for us several times in the past and has sewn up many inspiring versions of our patterns.  Her blog has been one of my favorites for a number of years now.  Combine all of these elements and you can see how thrilled I am to tell you that Meg has written a guest post for our blog today and has plans to write many more in the future!

Now let me pass you over to her – enjoy the post!

PIc ThumbnailHi I’m Meg! Making clothes is my creative outlet, and I started sewing and knitting in school when I realized I couldn’t wear a thesis or embellish my reports. Along the way, my sewing adventures have led me to knit scarves in the Peruvian Andes and refashion traditional dresses in Mexico City. I love to make things up as I go, mixing patterns and making changes on the fly. Professionally, I’m a researcher who loves presenting data visually in formats that are easy to understand. I hope you’ll follow along as I present inspiration and tutorials from Thread Theory patterns! You can also find me at megmadethis.blogspot.com.

Customize Pants Pockets

In men’s clothing, the details are everything. While womenswear tends to plays with dramatic silhouettes and design elements, menswear is all about classic tailoring with special touches. On the Jedediah and Jutland pants, one place to add that special touch is the back pocket. Below is some inspiration for back pocket embroidery to suit a variety of styles.

1. Abstract

Abstract

Source: Diesel Jeans & Boots, Jeans & Leather

These pockets have a fun, modern look, and are easy to sew!

2. Topstitching

Topstitching

Source: Stronghold & Pronto Denim

Sometimes something as simple as a line of topstitching can create an interesting effect. These pockets play with the unique shape of the pocket and elements such as rivets.

3. Nature Inspired

Nature Inspired

Source: Prima Jeans & Two Random Words

For the outdoorsy guy, I love nature-inspired pockets, especially for a rugged pattern like the Jutland Pants. You can allude to nature with an organic shape like waves, or do what fellow blogger Sophie-Lee did and embroider a landscape.

4. Embroidered Shapes

Embroidered Shapes

Source: Vintage Sergio Valente & Japan X Lee

If you are handy with your sewing machine or have an embroidery function, shapes are really fun. Perfect for the playful guy!

5. Embellishments

Embellishments

Source: Phable Jeans & Vintage Jacket

These subtle embellishments prove once again how small details can enhance a design. On the left, scraps from the selvedge edge have been stitched down to the pocket. On the right, small pieces of leather decorate and strengthen the pocket.

6. Fabric

Fabric

Source: Apliiq Jeans & Pinterest

This technique can be either loud or subtle, depending on the fabrics you choose. While I love the flower look on these jeans, more conservative dressers might appreciate the subtle variation of a similarly-colored fabric with a bit of texture.

7. Special Touches (1)

Special Touches

Source: Pinterest & Kings of Indigo

Sometimes plain and simple pockets are the best. But even then you can have some fun with it. Initials in the corner are a simple way to go. Or, do what denim company Kings of Indigo does and embroider a design inside the pocket where only the wearer can see it.